
|
I knew a period of time like this would come. Two weeks ago I was involved in a week long photo shoot for one of my articles. Last week I was in Las Vegas for work. This week I'm parenting alone, and next week I'm on vacation. So, there is no way I'm going to get a new box posted this week or next week. I have boxes under way, I just won't get a chance to finish and photograph them in time. (A set of four is near completion, but not close enough.) That's OK. By my reckoning, I'm at least two weeks ahead of schedule. And I'm going to take this time away to complete the drawings for several more-complicated boxes that I'd like to make. When I return from vacation, I'll be moving full steam ahead. I'm nearly half way to my goal in far less than half a year. However, I do plan to write one or two posts over the next 10 or so days. They'll be about design more generally. I hope you'll enjoy them, too. And perhaps they'll provoke a bit of discussion. In the meantime, enjoy a short video of me planing a bullnose on the edge of a cupboard top.
1 Comment
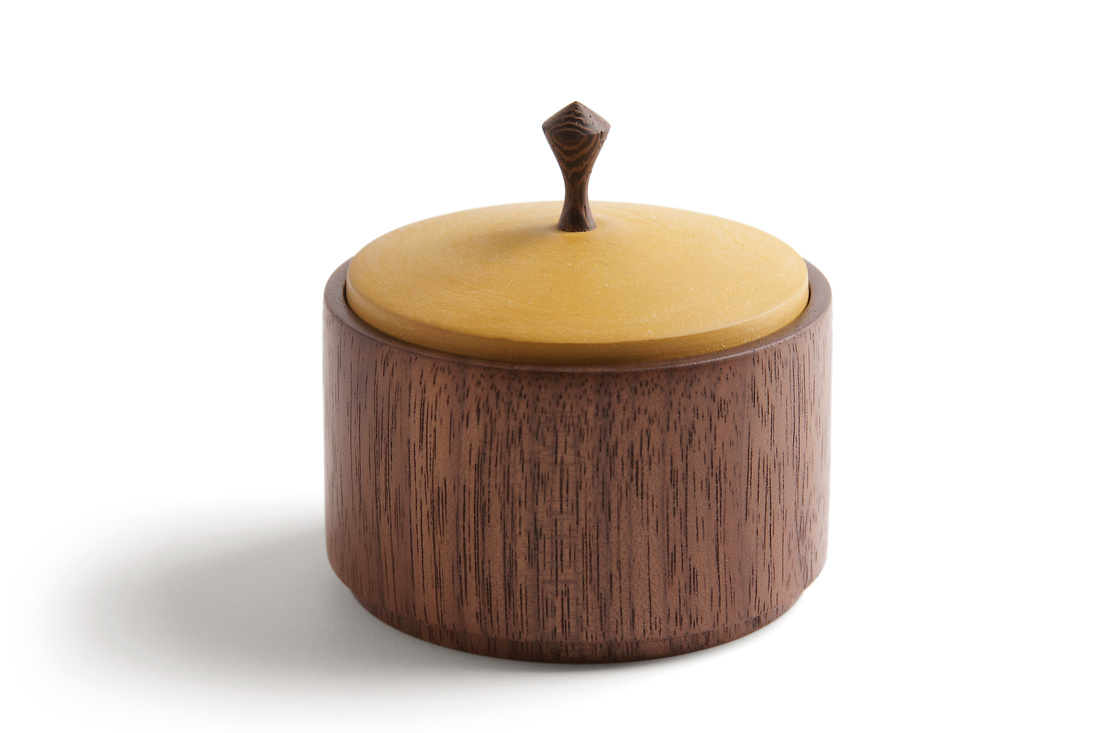
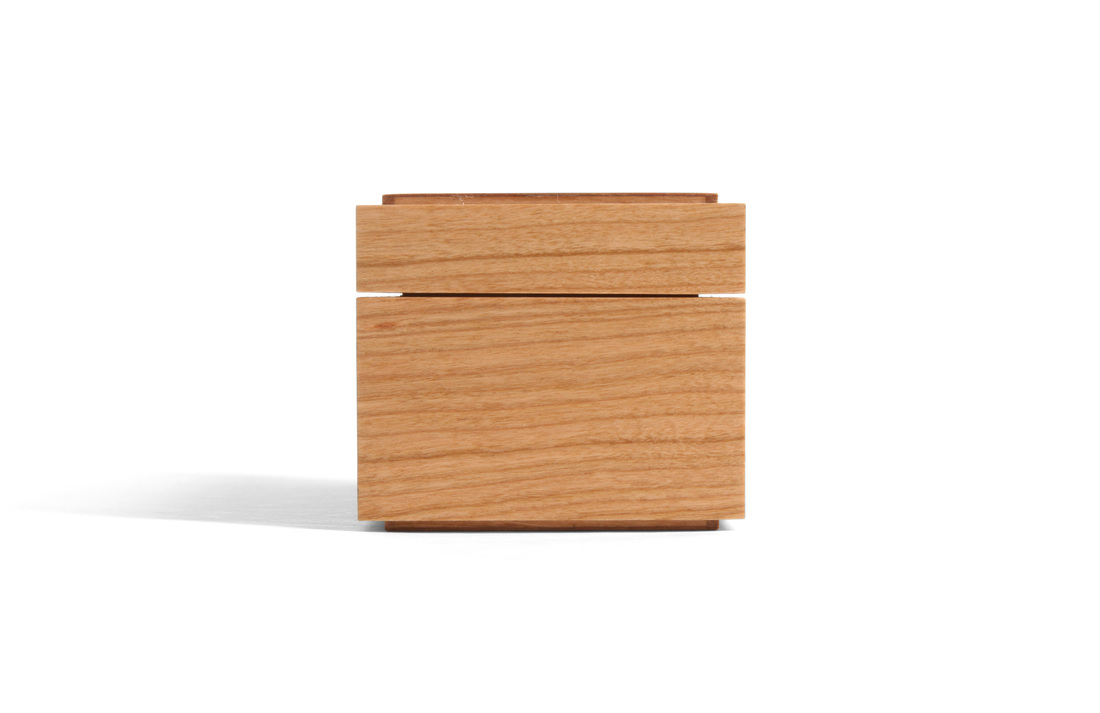
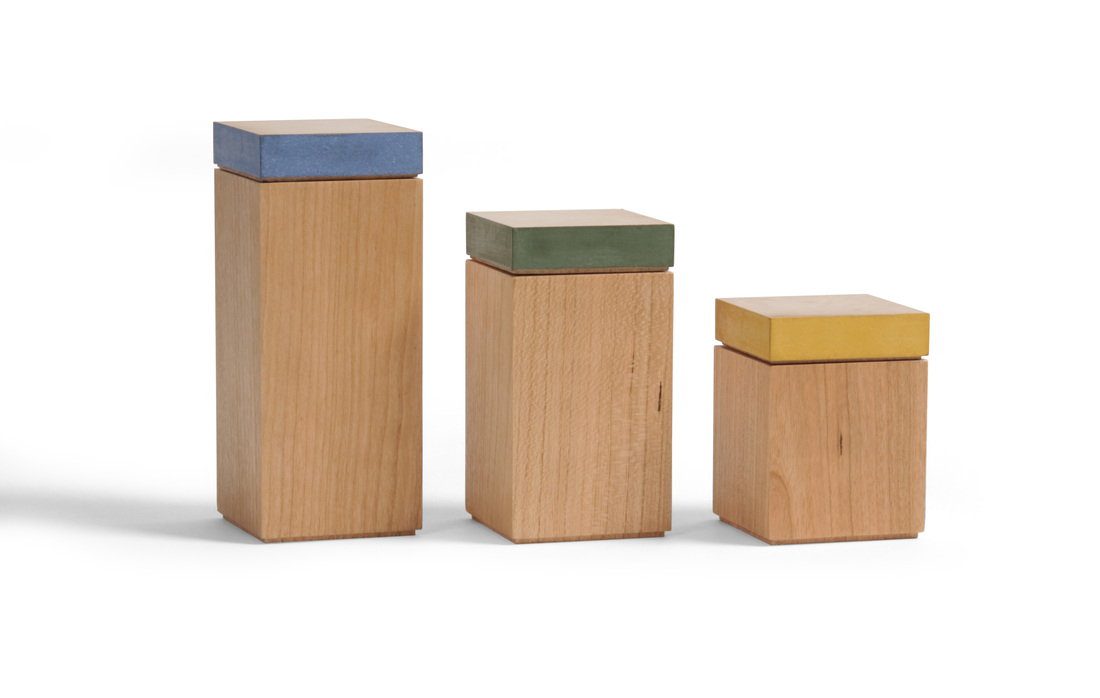 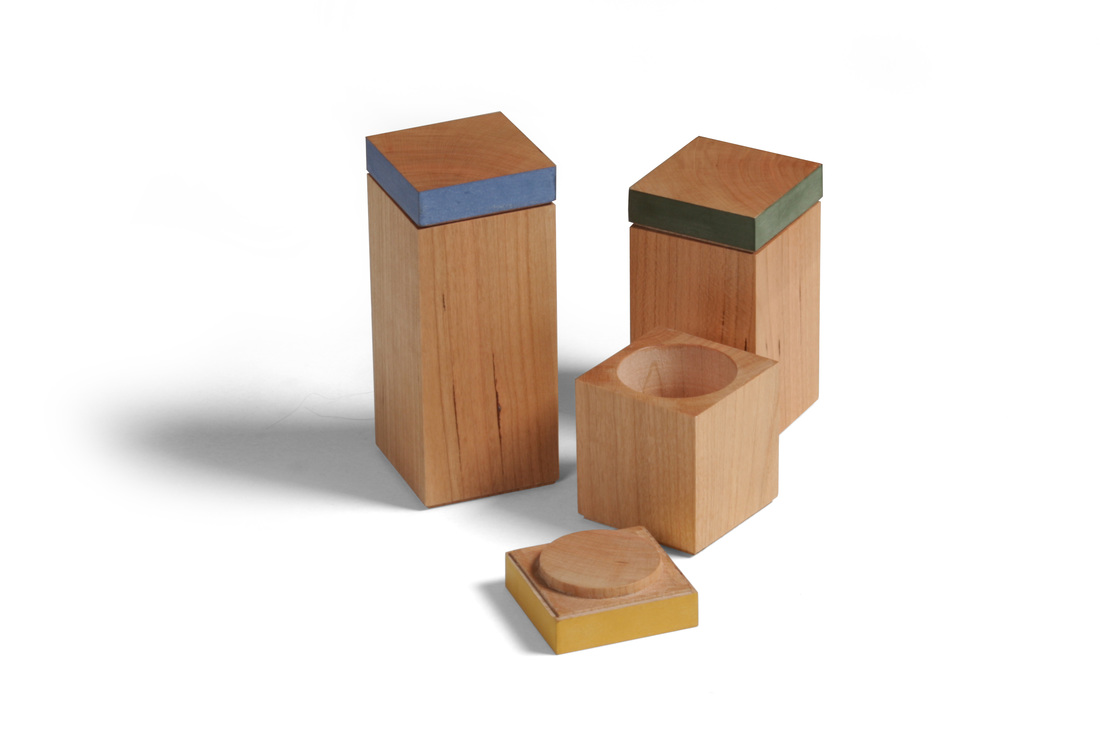 I made these boxes because I asked myself a question while driving back from Maine. The question: What's the easiest and quickest box I could make? The answer, I thought, would be to drill out the center of a block of wood. Because of the round interior, the lid would need a matching round "plug" to keep it in place. Turning this would be quick and not difficult. So, I started with a technique and the technique largely determined the design. This explains, I think, why the boxes have a mechanized or mass produced feel to them. Normally, I design and then figure out how to make a box or piece of furniture. It results in work that has a far greater sense of having been made by a human hand. At any rate, I think I'll give this reversed working order another shot down the road--to see if I can eliminate the imprint left behind by allowing the technique to determine the design. I used some 8/4 cherry for the boxes, and after milling the board square, planing the faces clean, etc. the boxes ended up being about 1 3/4 in. square. I cut the bodies to length (2, 3 and 4 in. long), then chucked them into my lathe, where I drilled the holes with a 1 1/2 in. Forstner bit. This works fine, but my bit is getting a bit dull, so the holes aren't as clean as I'd like. The lids were also made on the lathe. After turning the round rabbet that fits into the box, I cut them to length at my bandsaw. The visible thickness of the lid is about 1/2 in. The process of making the boxes wasn't very hard, but it did have some problems that needed to figured out. For example, I should have cut the boxes to length after drilling them out. The lathe chuck left marks in the body that had to be planed away. Had the boxes been long, I could have just cut off the area with the marks. I really should have thought of this before I made them. (But I started making the boxes before I really thought through everything carefully.) Well, enough about technique. Here's what I like about the design. The best things about the boxes, I think, are their vertical orientation and the end grain on the tops. Using a piece of riftsawn cherry makes both work well. The straight grain running vertically on all four sides compliments the design, and also creates cool, diagonal end grain. I also like the bit of separation between the body and lid. It was created by rabbetting the lid after the round "plug" was turned. As for the the other side of the coin (what I don't like) I'm not sure if the painted edge of the lids works. Had the edge been thinner, it would look much better. Also, the round interior is not so great (I wonder if the shop's hollow chisel mortiser could hollow out the tallest of these boxes? I think have some expermenting to do).
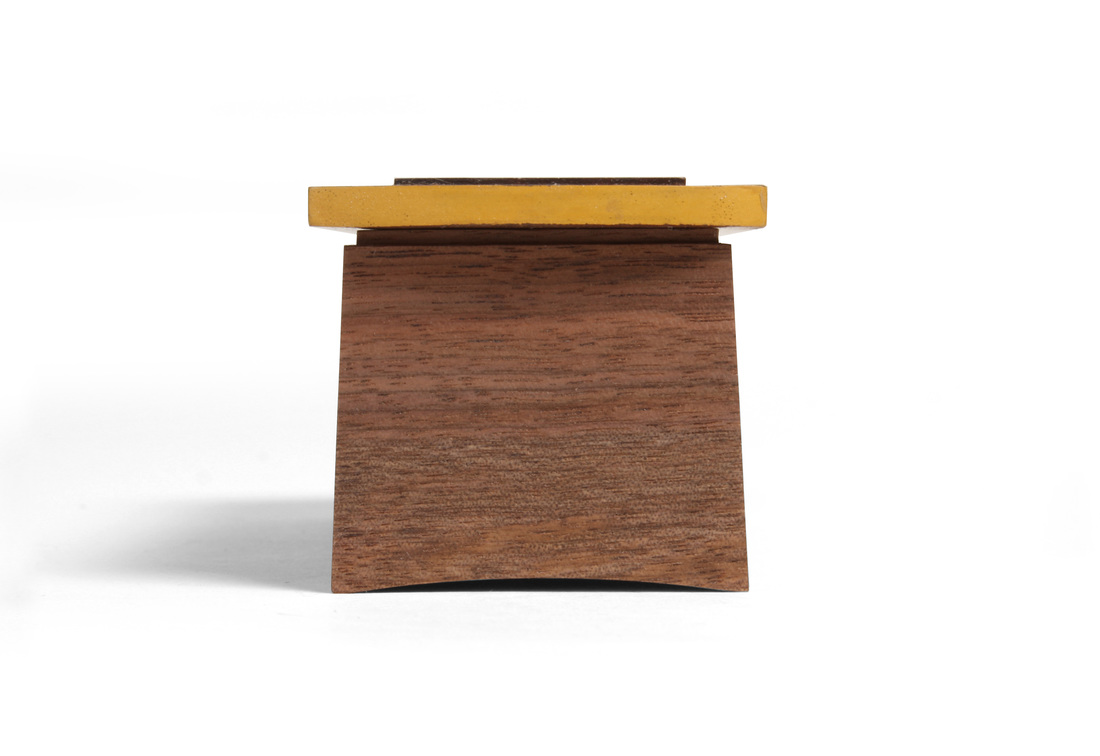
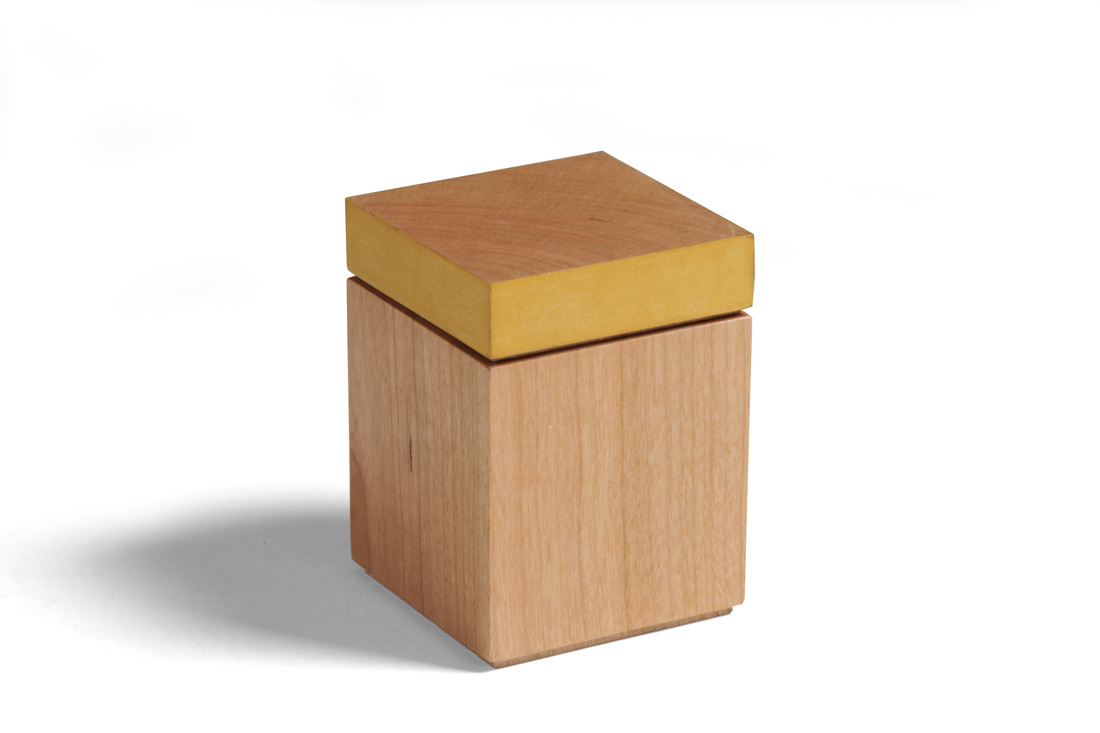
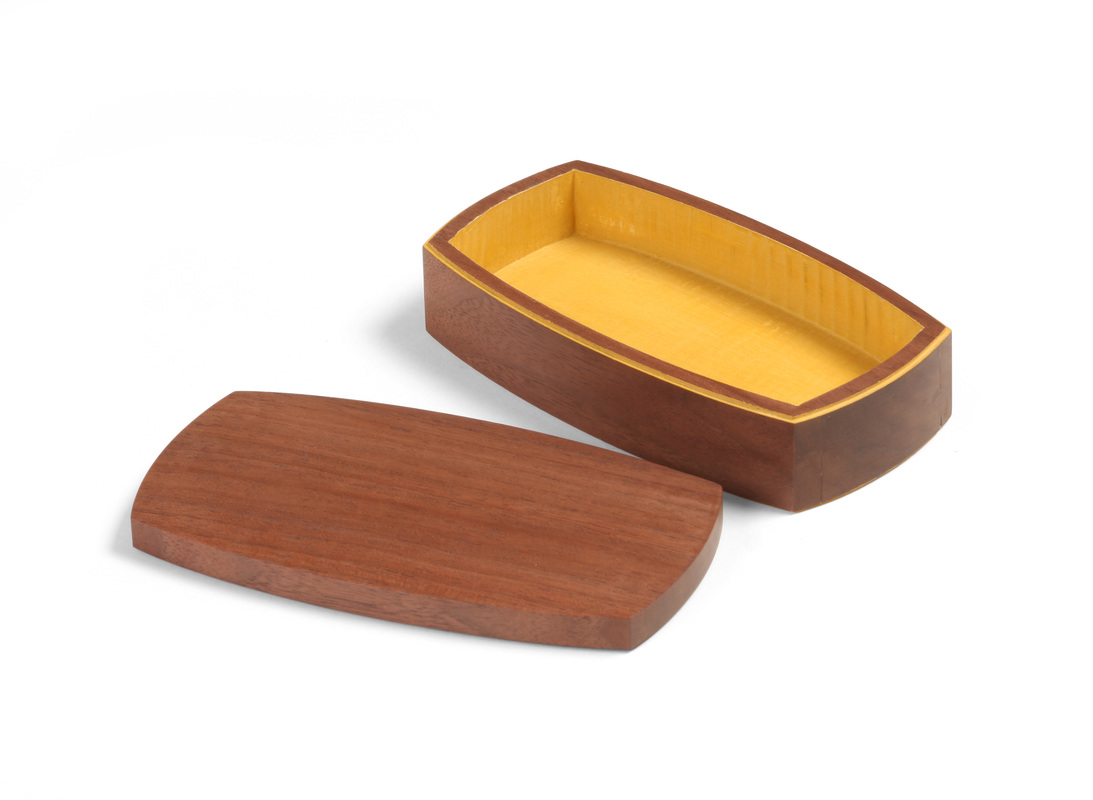
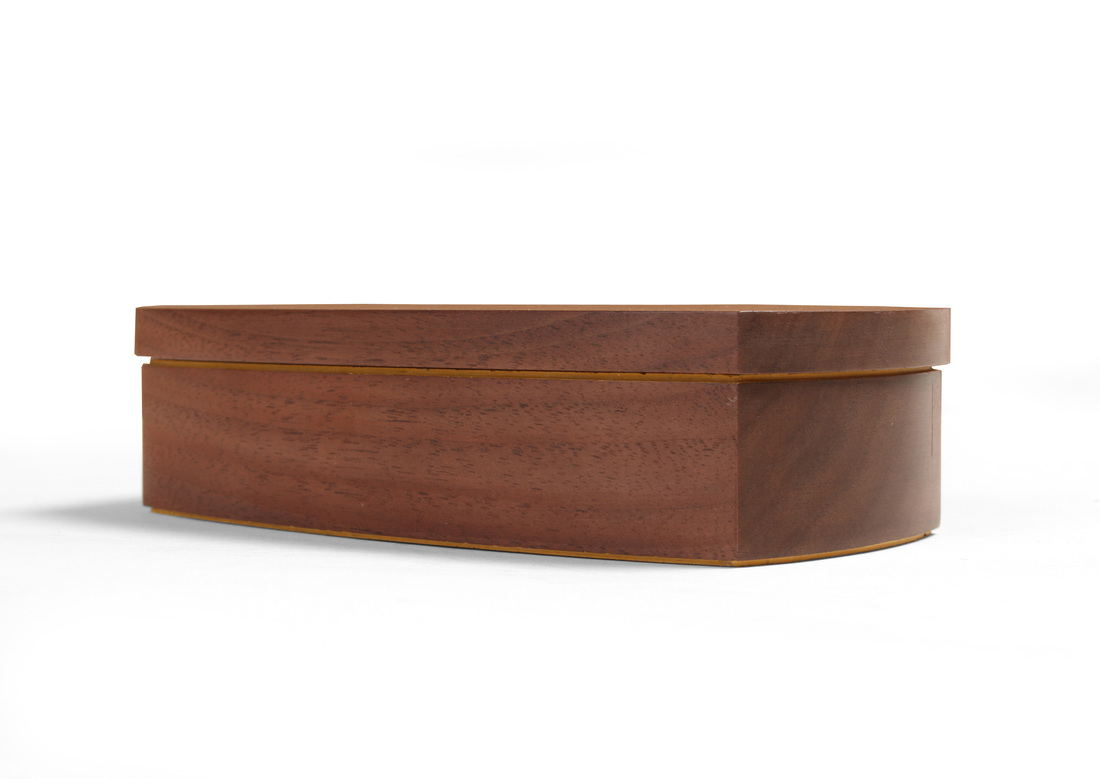
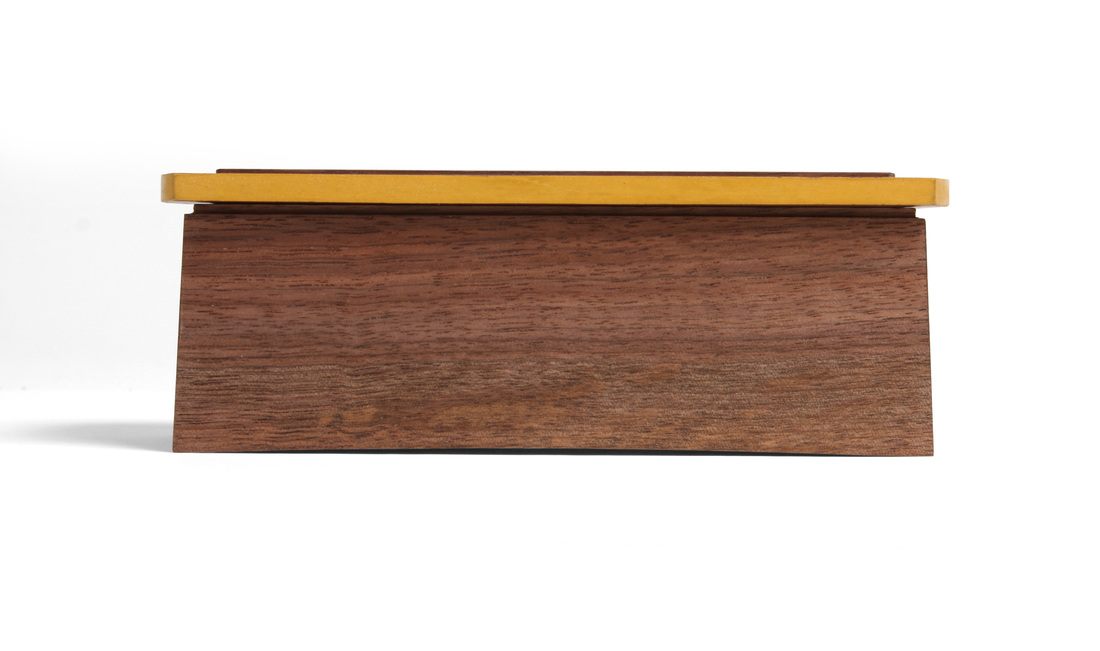
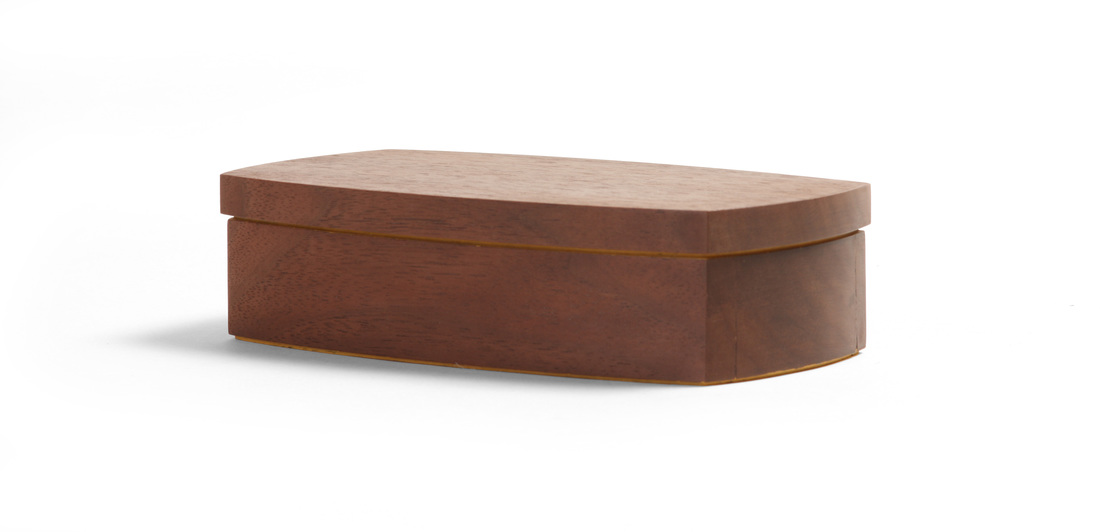 This week I took another stab at a bandsaw box. I decided to stay with walnut and marigold yellow paint to have a connection from my first attempt. It also has a similar shape, but because the blank was much wider, I was able to give the sides a more pronounced curve. But this one is shorter, as it was made from a piece of 8/4 air-dried walnut, and I like the shape. The first one was made from a piece of 8/4 walnut (from the same board), but was turned on edge, so that the width (instead of the height) came from the 2 in. dimension. I took other design details from the earlier box. I rabbeted the bottom edge of the sides to give the box some lift off of the surface, and the lid overhangs the sides. I also rabbeted the top edge of the sides, a detail I borrowed from the last three boxes that I made. And borrowing from the white oak version of those three boxes, I painted the top (and bottom) rabbet. I especially like this detail on the top edge as it emphasizes the separation between the lid and box. The milk paint continues on the inside of the box. I did not clean up the machine marks on the inside, so there is also a nice texture to the interior, and after I sanded the paint to smooth it, a bit of the walnut color peeked through. It's a nice touch. As for the process of making a bandsaw box, I think I did better this time. I used the same technique, but added a shopmade pivot fence, so that when I cut the sides free from the middle I could control their thickness more easily. I liked having the solid point of reference to work off.
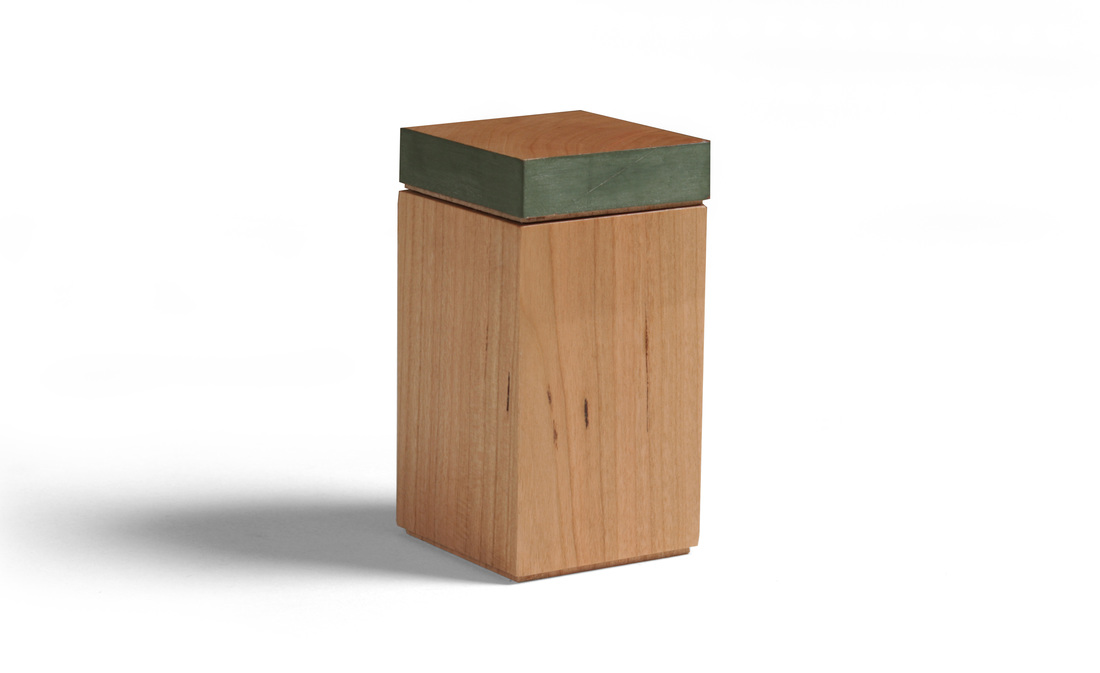
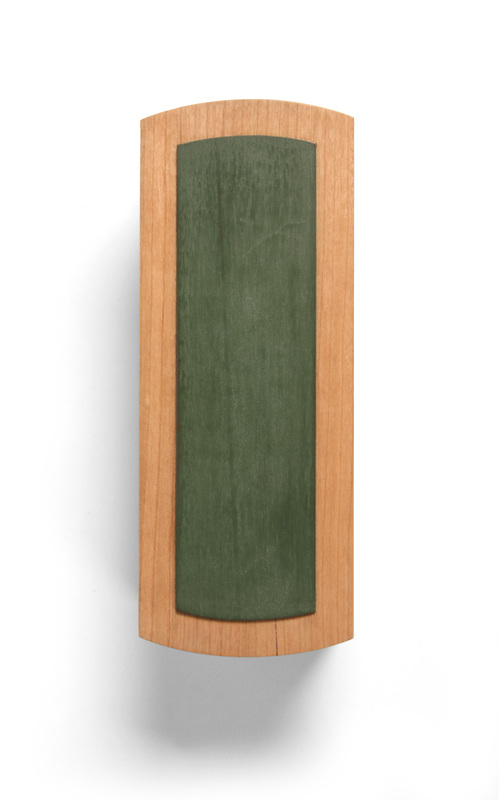
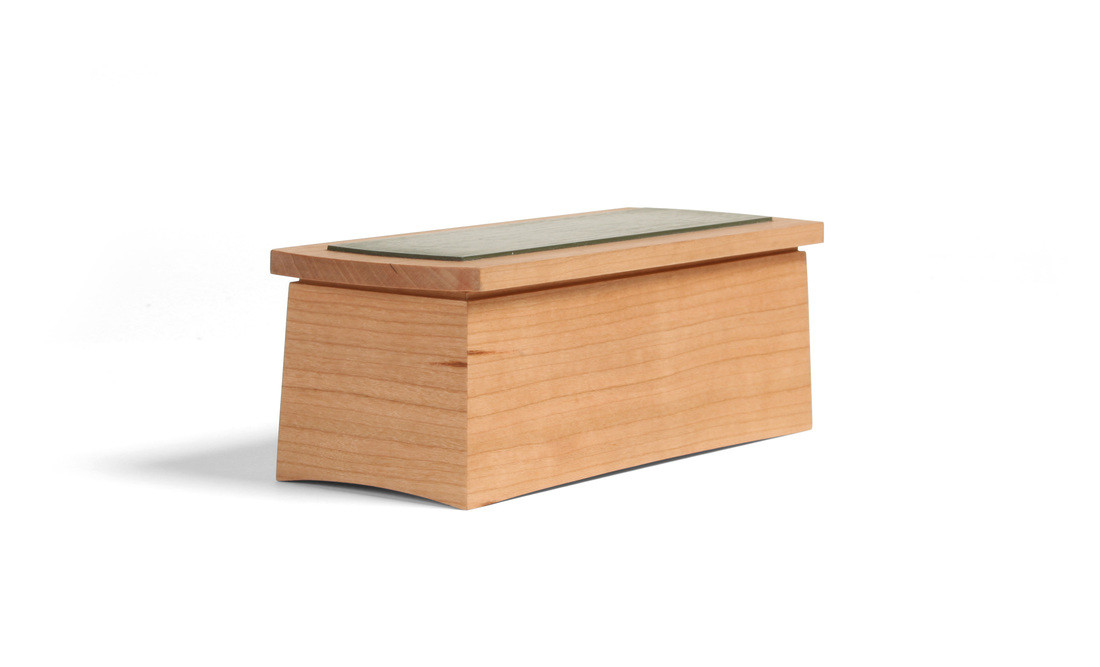
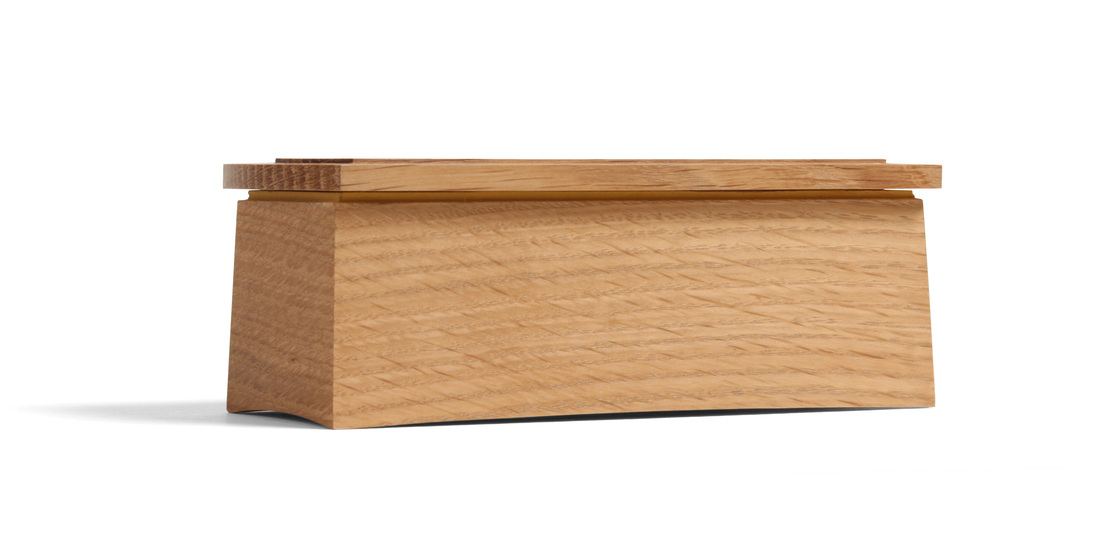
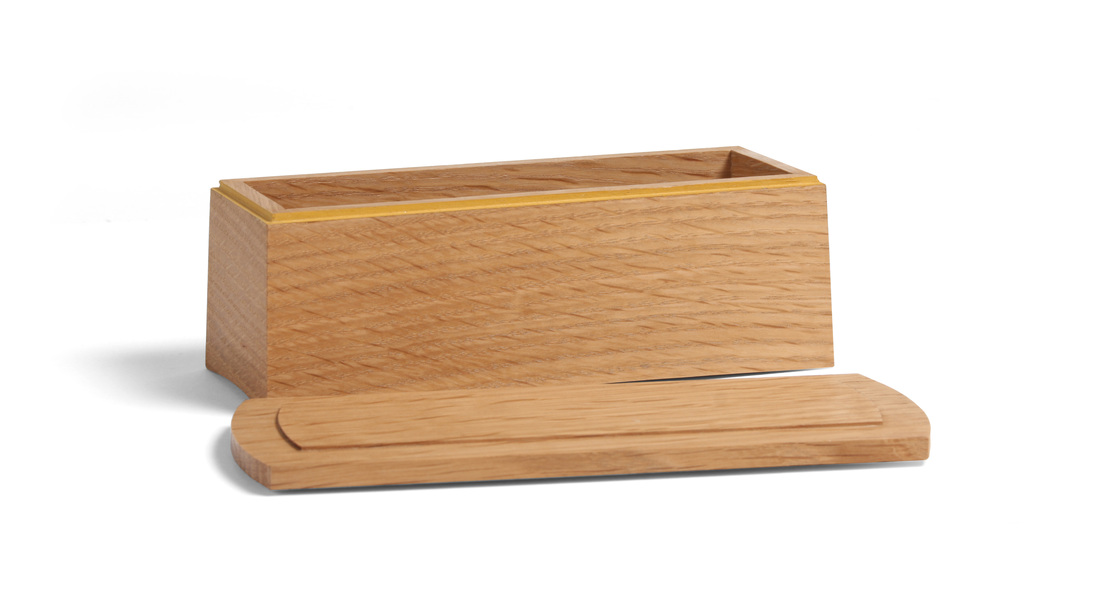
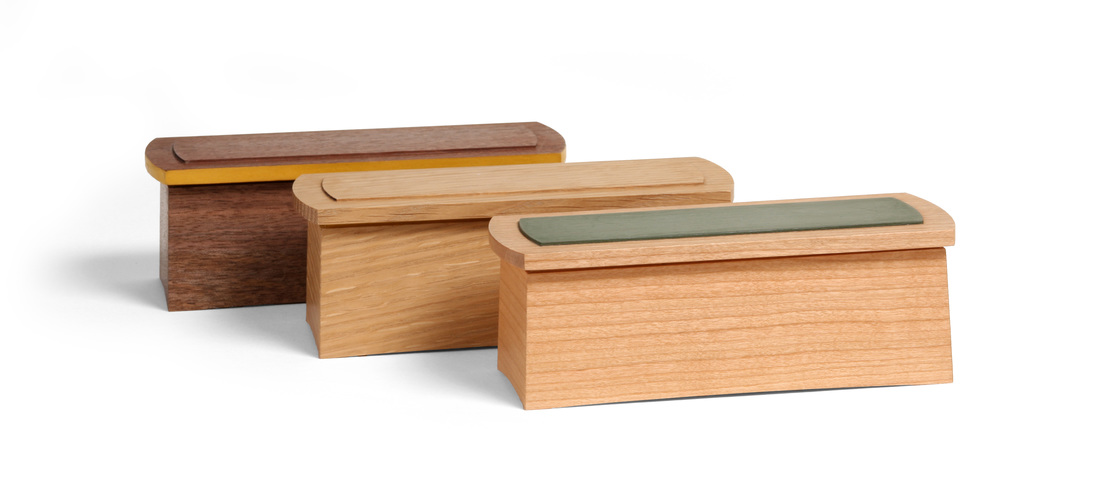  I'm not sure where to start with these boxes. I could talk about the design, and I certainly will. However, in making these boxes I employed a technique that is pretty freaking brilliant (I developed it with significant help from Mike Pekovich). I guess I'll start with the design, as that will naturally lead to the technique. There is quite a bit going on with these little boxes (they're only 6 in. long), but it all started with a desire to make a box with sides that slope gently inward. I don't know the angle of the slope. I sketched it out on graph paper, and went from there. But it is very slight. Because the sides slope inward, the miters at the corner are compound, and that's where the technique comes into play. I'll get to that soon. I believe that a box needs to be lifted off the surface in some way. The way I normally do this is to have a bottom that is slightly proud (1/16 or 1/8 in. depending on the size of the box) of the bottom edges of the sides. This lift creates a nice shadow line and gives the box a sense of lightness. With these boxes, I decided to try something different. I cut a gentle curve into the bottom edge of the sides, create "feet" at the corners. The arc suggests that the box lifted up off the surface. All of the arcs are 1/8 in. tall at their apex, but the ones on the ends look taller, because the radius of the arc is smaller than the radius of the arc on the front and back. I really like this technique for creating lift and I'm sure that I'll return to it. When I first sketched this box, the lid sat directly on top of the sides. It struck me as odd, as if the lid was a heavy slab holding down the box. I though some lift would be nice, so I rabbeted the outside edge of the sides. The rabbet gives the tops a bit of float, and I really like the shadow line it creates. The tops have a shallow rabbet on their bottoms, which creates a raised field in the middle of the lid. This field fits into the box and that's how the lid stays in place. Because the box is rectangular, the sides of the field need to be straight. So, before I rounded the ends of the lid, I cut the rabbets on the bottom. I then formed the round ends with a template and router bit. After the ends were arced, I routed the rabbets on the top of the lid so that the field would be arced on the ends like the lid. I decided to make the box in three different woods (and I actually made two in each species, for a total of six) for several reasons, some having to do with experimenting with a new technique, but the primary reason was so that I could try out different ways of using milk paint on the box. The walnut box has paint just around the edges of the lid. The cherry box has it only on the top field of the lid. (I like the Lexington green with cherry.) I used marigold yellow on the white oak box, too, but where isn't immediately obvious. I painted the rabbet on the top edge of the sides. You can see it when you open the box, of if you get down low and view it from straight on. This box got the best reaction around the office at Fine Woodworking. OK, enough about design. On to the technique. I'll explain it as best I can, but I'm sure that I won't explain as well as should be. (I see an article in my future.) Compound miters are a pain to cut. Normally, you angle a miter gauge and then tilt the tablesaw blade to some angle other than 45 degrees. Because I worked on an article with Chris Gochnour, I know a technique for doing this that doesn't involve any math. It's a technique that Steve Brown from North Bennett Street School wrote about about 10 years before. It works, and I've used it, but I thought there might be a better way. So I went to Mike one day and threw some ideas at him. He came back with the wedge. He said that I should cut a wedge to match the slope of the sides, put it on a crosscut sled, and then tilt the blade to 45 degrees. The wedge would hold the sides at the correct angle to cut the compound miter. I immediately saw that it would work, and it did. The miters were absolutely perfect. And it was so easy. By the way, the wedge I made was actually longer than the front and back, so that it supported the full length of the sides. But I took the wedge even further. I realized that I could put the wedge in the routing templates for the arcs and that when I routed the sides, the bottoms would automatically be cut with the correct bevel on them. I also used the wedge when I ripped the sides to width, and that cut the top edge at the correct bevel. I even used the wedge to cut a groove for the bottom, and the rabbet not the top edge. Without the wedge, all of this would have been difficult. With the wedge is was dead simple. There was no fussing with the blade angle. For the miters it was at 45 degrees. For all of the other cuts, it was square to the table. There was no hokey pokey with miter gauge fences. I used my everyday box sled for all of the cuts. The routing templates were made as normal and then a bit of wedge of put on them. Freaking awesome. Random thoughts.
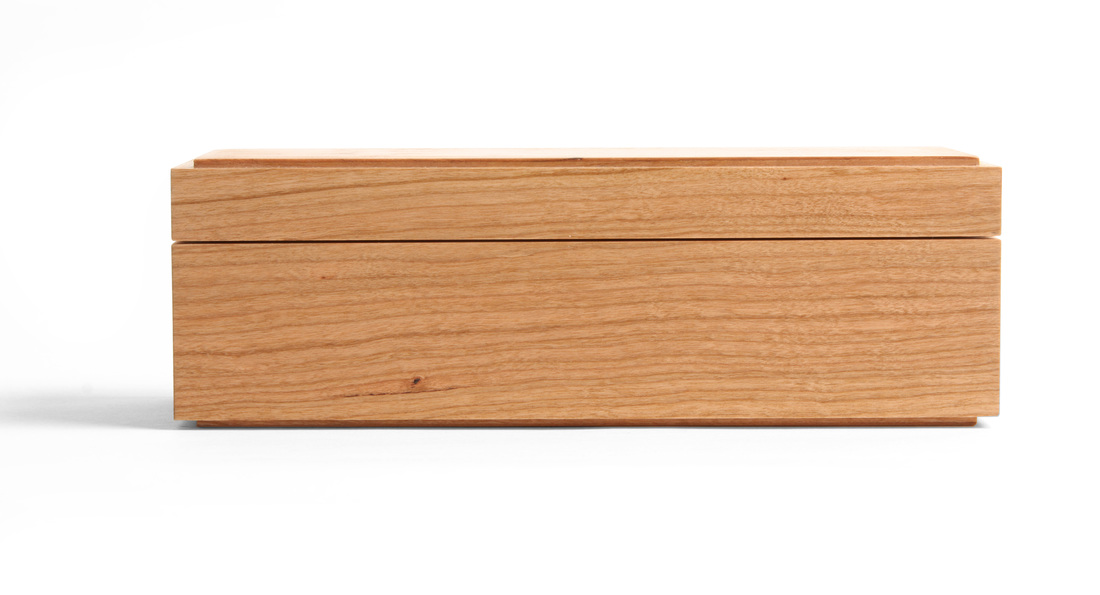
  I have an Instagram feed, and a few days ago I posted a picture of box 12 to it. One fellow commented that he'd like to see what I'd do if I designed a box to hold a specific item. That's a perceptive query, because honestly I normally don't worry about what a box will hold when I design it. Another editor at Fine Woodworking has said many, many times that boxes of the sort I make really have no function in modern society, and he likes to make his point by repeatedly joking that every box is really just a place for a person to stash his or her stash. But boxes can have a purpose. Mike Pekovich, who also works at Fine Woodworking, has made some beautiful boxes to store tea packets. But I'm not worried about function when I design a box, except on rare occassions. For me, boxes are decorative and I see them as an opportunity to make something that is beautiful. I suppose you could say that the purpose of my boxes is to be beautiful. I don't know if I've made any boxes that are truly beautiful, but I like them. I'd like to think that when my time in the shop is over for good that I will have made one truly beautiful box or piece of furniture (unlike boxes, furniture should always be functional). The pictures I've included with this post show the furniture and boxes that I think are the closest to being beautiful. Nonetheless, the primary goal of this 52 box challenge is to push myself in terms of design, so I'm going to make an effort to design a few boxes for a particular function. Over on Instagram, it was suggested that I make a box for a set of dominos. I'll give that a shot. Another suggestion was to make a box for an old Stanley level. Hmm. Should it be just a storage box or a storage/display box? I'll think on that. And then get in the shop and see what I can make. 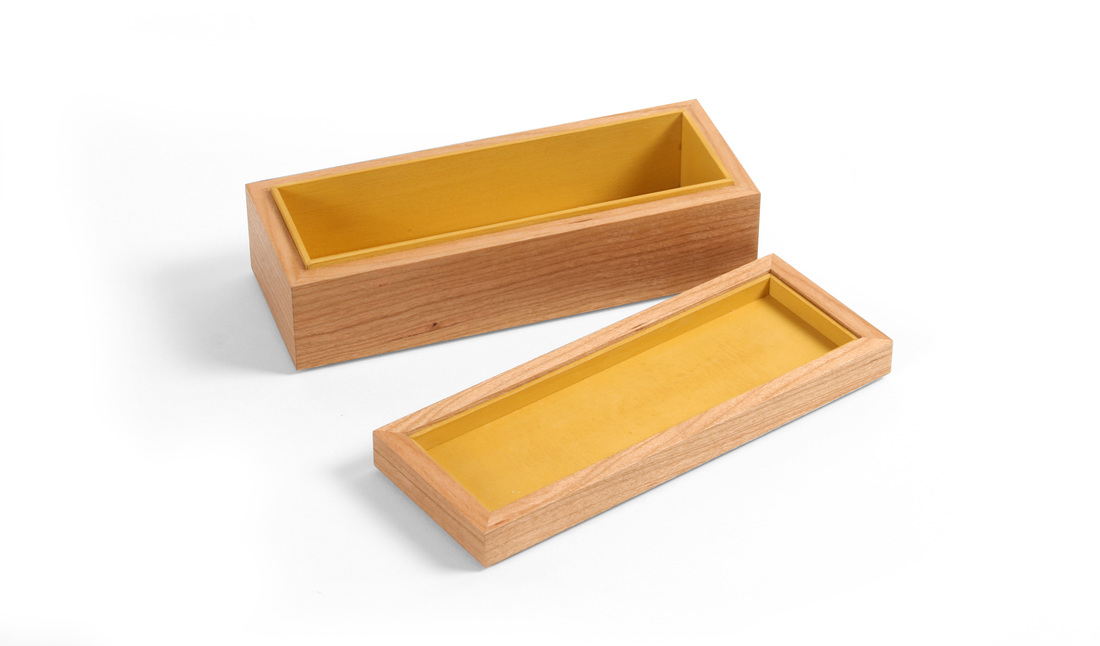 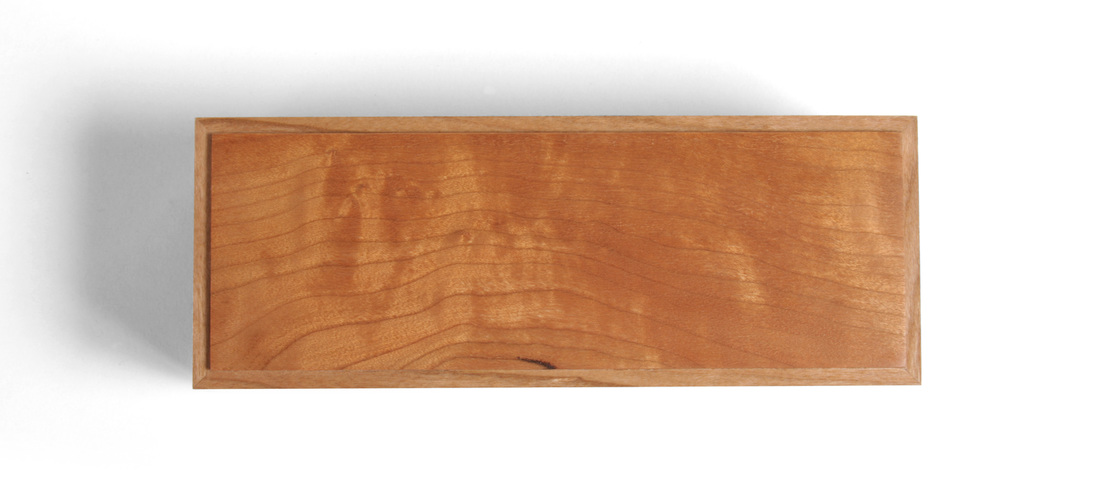 The proportions and general design of this box are strongly tied to the boxes that I've already made, but there are two new twists, and both work nicely, I think. First, the complete interior is painted. The inside faces of the top and bottom are painted, but the inside faces of the box sides are not. Instead, I painted some liners and put those in after I cut the lid from the box. I did this instead of painting the sides, because I wanted to use the liners to achieve the second new feature. Notice that there is a liner not only in the bottom (a common technique to keep the lid in place), but also in the top to create a small (1/16 in. wide) separation between the box body and lid. By adjusting the height of the liners in the lid, I could alter the width of the space between the box and lid. I like the dark shadow line it creates. I settled on 1/16 in. because that's the width of the kerf cut by the blade in bandsaw (it has carbide teeth, so it cuts a wider kerf than many bandsaw blades). The grain flow from bottom to lid is natural this way. There's no discernible hiccup in the flow as there would be if the lid sat directly on the box sides. Also, the top and bottom are both 1/16 in. proud of the sides to mirror the shadow line between the lid and body. Now, back to the painted interior. I've wanted to do this for a long time, but this is first box it was suitable for. Perhaps it's not a surprise, but I like it. To do this successfully, the interior must be lighter than the exterior. Right now the cherry is still a bit reddish pink, but it will darken in time, the marigold yellow on the inside will stay just the same, but pop all the more as the cherry darkens. It's really going to be eye catching in about a year. And, of course, marigold yellow milk paint has once again done me right. If only she could drink whisky, dance to Van Morrison in the setting sun, and cook a mean low country boil. The cherry veneer I used for the top and bottom is much darker than the cherry I used for the box and lid sides. Part of that is a function of age. I've had the veneer for at least 8 years. But it was dark when I got it, and it didn't change color when I scraped and sanded it. It is oxidized all the way through. You might think that's only possible because it's so thin, but I've cut into very old cherry boards that were completely oxidized throughout their thickness—and these were 1 in. thick boards. Jointing, planing, hand planing did not change its color. I hope the veneer is always darker than the sides. They compliment each other nicely. And this can be applied more broadly. What's a great wood to pair with hard maple? Figured maple. A good wood for sapele? Ribbon figured sapele. You don't need to go to a strongly contrasted color to create variance. Do something subtle. Subtle is good. These thoughts be random. Argh!
|
AuthorI love furniture design, and smart techniques. This blog is about both. Archives
August 2020
Categories |


 RSS Feed