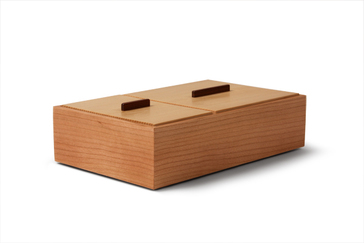
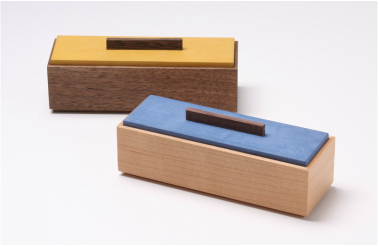
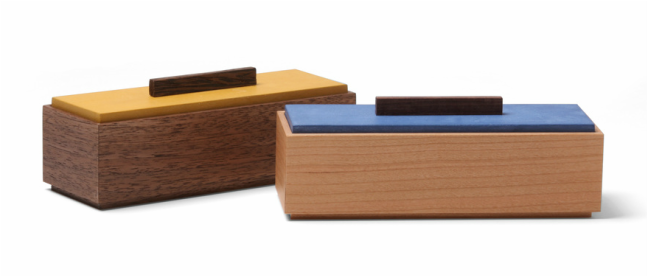
 Box with two compartments. Cherry, spruce, cocobolo. 2 in. x 5 in. x 8 in. Box with two compartments. Cherry, spruce, cocobolo. 2 in. x 5 in. x 8 in. These are boxes 1 and 2 in my 52 weeks, 52 boxes challenge. I wanted to make a small, delicate box. But then I thought the box would like nice as a pair, so I made one in walnut and one in cherry. I'm happy with how they turned out. Together, they make a bold graphic statement, and they should remain a pair, I think. I made them both in the first week of the challenge. I like the proportions: just over 1 1/2 in. tall, 1 3/4 in. wide, and 5 in. long. That's really small, but I think that I can go smaller. I'm sure I'll give it a try later in the challenge. I should note that because the ends are so short, I cut the sides apart with a dozuki, and squared up the ends at my shooting board. I then cut the miters at the shooting board, too. This technique resulted in a very good four corner grain match, because cutting out the sides and mitering the ends removed very, very little material. I think I'll continue to make small boxes this way going forward. (It also helps to start out by resawing with a thin-kerf bandsaw blade.) The overall design is similar to other boxes that I've made, like the box with two compartments in the photo above. The big difference is that this new box has a single, painted lid instead of two wooden (spruce) lids finished with shellac. This is the sixth box I've made using the same key design elements as a jumping off point. I also tried out a new technique on this box. On previous boxes, I used a solid wood bottom that I rabbeted. The resulting tongue on the bottom's edge fits into a groove in the box sides. The sides of this little walnut box are far too thin (less than 3/16 in.) to hold a groove. Instead, I rabbeted the bottom edge of the sides, and glued the bottom into the rabbet. Don't worry, it's not a solid wood bottom. I veneered a thin (3/16 in. thick) piece of walnut to each face of the plywood, trimmed them flush to the edges, and then glued walnut edging to all four sides. The walnut veneers were glued down perpendicular to the grain on the plywood's surface veneers. There won't be any seasonal movement, so there shouldn't be any problems. I got the idea for the bottom from how I make backs for wall cabinets. There is one other construction technique worth mentioning. I typically glue lid lifts on with cynoacrylate glue, but that wouldn't work here. I'm sure the glue would stick to the milk paint, but it could come undone eventually. So, I drilled two pilot holes in the top, drove in some little brad nails and snipped off their heads, leaving about 1/4 in. of nail sticking out. I drilled holes in the lift, dropped some glue into the holes, and put the lift on the nails. It worked brilliantly.
16 Comments
 These were the first boxes I made after starting the 52 weeks, 52 boxes challenge. I'll have more to say about them in an upcoming post. These were the first boxes I made after starting the 52 weeks, 52 boxes challenge. I'll have more to say about them in an upcoming post. I played baseball when I was a kid. Here's what I learned from my dad about how to get better at hitting, base running, catching fly balls and everything else baseball related: practice. Do it over and over and over until it becomes second nature. This lesson is true of so much we do in life. When I switched to competitive distance running in high school and college, the only way to get better was to run more. At the peak of my running (in my late 20s), I was averaging 70 miles per week (and maxed out at 98 miles one week). The result? I ran faster and faster. Woodworking is no different. If you want to cut better dovetails, then you've got to get into the shop and cut them. Then cut some more. And after that cut several hundred more. Repeat for several years or a decade. Now your cutting dovetails like Chris Becksvoort. As ever, I'm working on my dovetails and all other joinery used in furniture making. I'm getting better. However, there is a skill that I haven't been practicing enough: design. Good design, I believe, is an acquired skill. Sure, it helps if you've got some natural talent, but it's not necessary. You can still create beautiful furniture of your own design if you work at it hard enough and for long enough. (You should, of course, practice good design over and over. There are some principles and concepts that can help you in that regard. I'll come back to them in the future, to share my limited knowledge of them.) So, I've set a challenge for myself: design and make 52 boxes in the next 52 weeks. What do I hope to accomplish? Honestly, I hope to jump start the growth of my design aesthetic, helping it move more quickly toward maturity. I know that making 52 boxes in 52 weeks will also hone my woodworking chops. After a year of near non-stop building, I should have refined my skills. Tighter joints, better finishes, and more beautiful boxes. That sounds nice. I should note that I don't plan to make a box a week. Because I often travel for work, occasionally get corralled into acting foolish in front of a video camera, and generally have a busy life, there's no way I could do that. One week I might make two or three boxes, then just one box over the next two weeks. Also, I know I won't end up with 52 unique boxes. I plan to make iterations of a single design, each time changing the wood used for the body or the paint for the lid (or making some other such change), to determine which I like best. Or I might modify a design until I've come to a fully resolved version of it. Finally, I'll post each box as I make it. I'll include some thoughts on the design, perhaps a note about a cool technique, or just tell you what I like and dislike about the box. If I'm really pressed for time, there might just be photos. Well, I should probably get to the shop. |
AuthorI love furniture design, and smart techniques. This blog is about both. Archives
August 2020
Categories |


 RSS Feed