
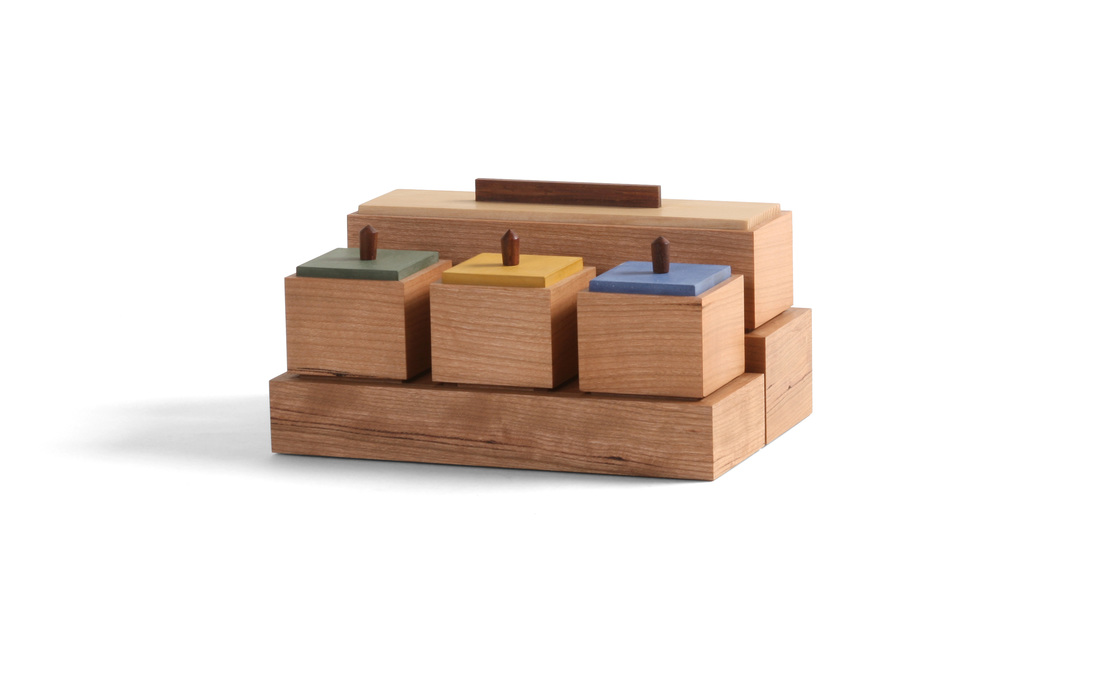
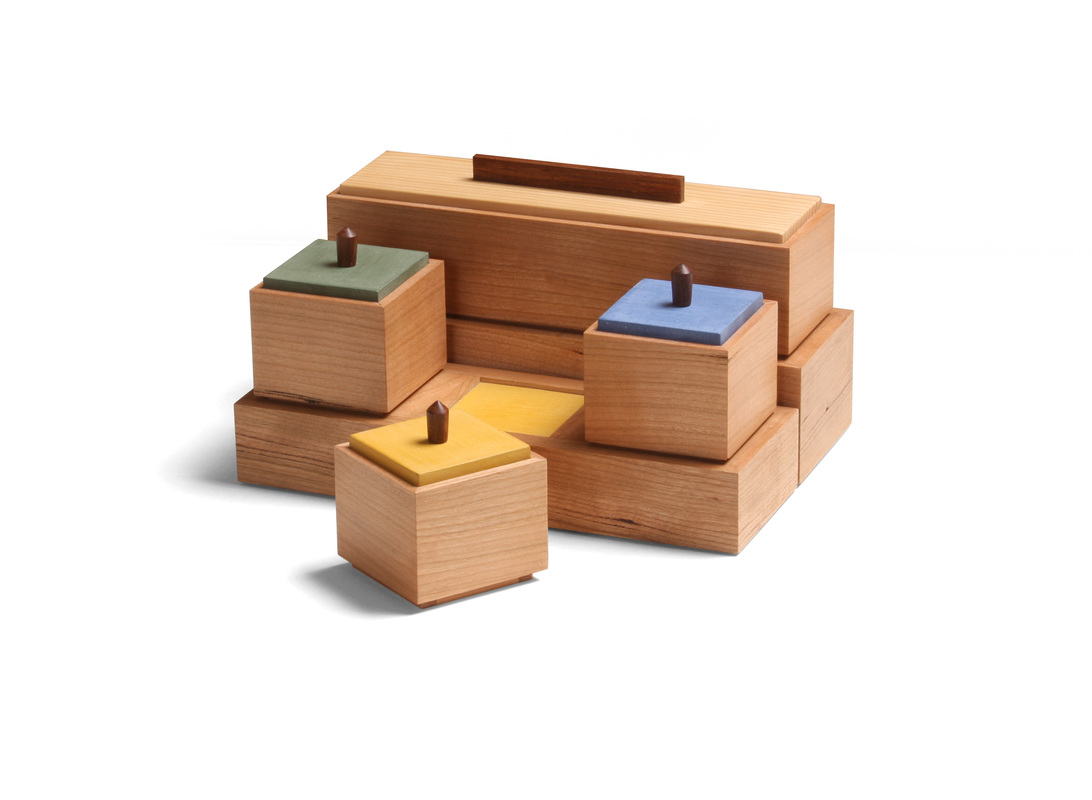
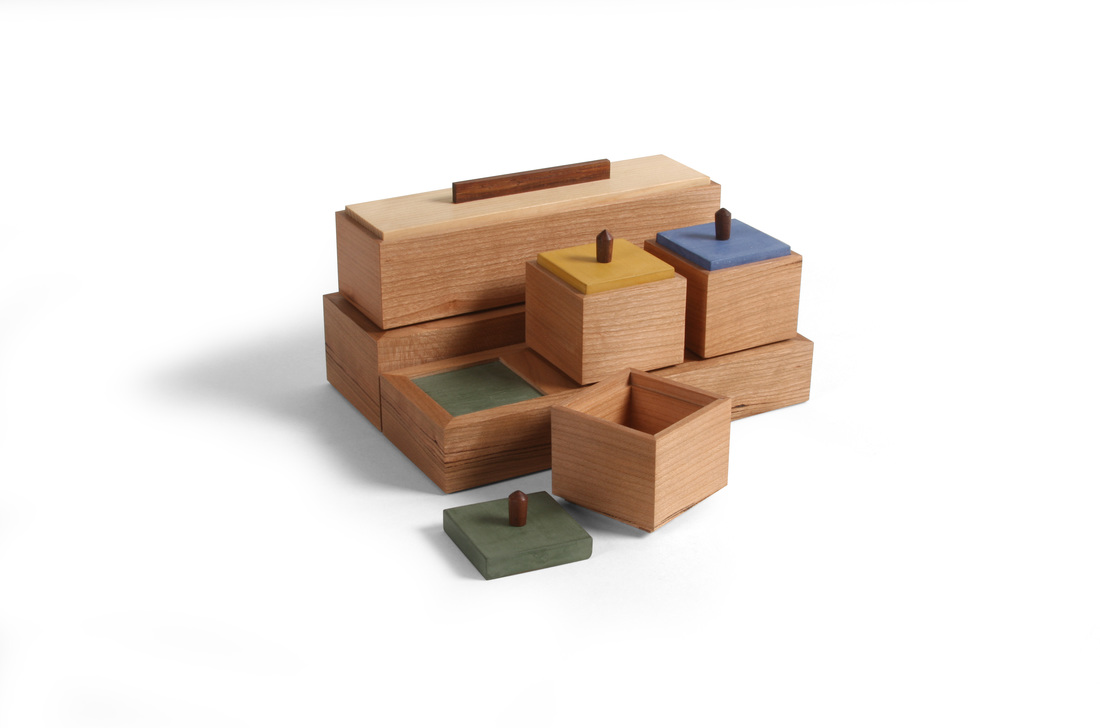
  I made this set of four boxes quite some time ago, but I didn't not what to do about pulls for the three small boxes up front, so they sat. I'm not crazy about the pulls I eventually turned for them, but at least the boxes are done now. If I were to turn them again, I think that I would give them a more pronounced inward taper from top to bottom. The problem is that they are so small that it's hard to get too much shape on them without risking too narrow a diameter for the tenon and lower section of the pull. OK, enough about what I don't like. (At any rate, the turned pulls are the only part of these boxes that I'm not thrilled with.) The idea for this box has been beating about in my head for a long time. I've sketched out numerous versions of it, and I might make a few of the other versions, too. (One version I'd like to try involves a set of small round boxes arranged radially around a rectilinear box.) I decided on this particular arrangement because I knew that the boxes would not be hard to make, leaving me to focus on the pedestals beneath them. For me, the pedestals are not just a place to put the boxes, but also a way to create negative space around the boxes. It's the particular arrangement of the boxes, included the shadow lines between them, that makes this set work. This meant that I needed to design them in such a way as to ensure that the boxes always maintain that negative space when the pedestals are fully loaded. The four sides of the pedestal are made like a mitered box. The bottom fits into a rabbet, and the thin "top" into a groove cut into the sides. To create the defined recesses for the three square boxes, I fit dividers into dadoes cut into the front and back. These dividers also have grooves for the colored "tops." (By the way, the colored "tops" are just pieces of 1/8 in. thick cherry painted with milk paint.) There was quite a bit of math involved in getting every thing sized right so that the spaces between the boxes would be the same size and would put the outside ends of the first and third boxes in line with the ends of the long box in back. It also took some figuring to determine how thick the sides of the pedestals should so that the boxes would be inset the amount I wanted. But I was able to manage (and I damn well should be able to, given the amount of education I have! It might have all been in the humanities, but I did well in calculus, too.). I really like the proportions of the square boxes. I started designing the boxes by determining the width of the rectangular box, because I knew that the square boxes would have the same dimension. I then had to do some work to get three square boxes to fit into the length of the long box. In other words, I sketched out different lengths for the long box, trying out various widths of the spaces between the square boxes. Then I worked on the space between the rectangular box and the there square ones. After I figured out all the spacing, I turned to the pedestals. I think it all turned out well. The recesses that hold the boxes are painted to match the lid of the box that fits into each one. For the rectangular box, which has a lid made from some very old white pine (salvaged from studs in my 100+ year old house), I mixed up a custom yellow that's close to the color of the pine. I like the little surprise you get from the colored recesses when you pick up one of the boxes. I had these boxes in the office today, and I heard several folks ooh and aah when lifting up the boxes. That's a great response, and it made me happy. And no one said a word about the turned pulls—as woodworkers were always harder on ourselves than we should be. OK, time for some random thoughts.
4 Comments
Matt Kenney
8/23/2015 12:25:33 pm
Franck,
Jerry Stark
8/24/2015 03:42:26 am
Very nice set of boxes. Proportions are perfect.
Matt Kenney
8/24/2015 06:04:56 am
Thanks, Jerry. And thanks for reading and following along so closely. Your comment will be posted after it is approved.
Leave a Reply. |
AuthorI love furniture design, and smart techniques. This blog is about both. Archives
August 2020
Categories |

 RSS Feed