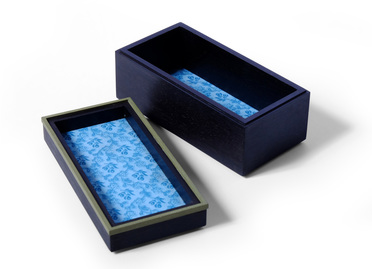
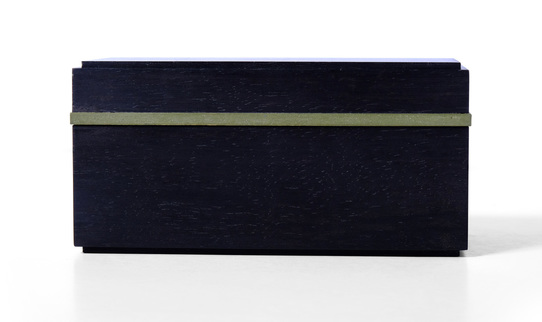
 This box came out of nowhere. As I was finishing box 35, I was a bit frustrated because the quality of workmanship is a bit lower than I'd like. There are a few gaps in the bird's beak joints. So, I decided to make a box and make it as perfectly as I could. For some reason the first thing that popped into my head at this point was a very small ebony box. I thought that if I could come up with a good design and execute it perfectly, then ebony would make the box seem like a little jewel. I don't know if I accomplished my goal, but I really like this box. For the most part it's a pretty normal box. It's 2 in. wide and 4 in. long. The sides are 1 3/4 in. tall. The top and bottom have shopsawn ebony veneer on the outside faces, and fabric on the inside faces. There's some shopmade poplar plywood between the ebony and fabric. The top and bottom are glued into rabbets cut into the sides. I glued up the sides, glued in the top and bottom, then cut the lid free. And here's where to box takes an unexpected turn. A common approach to keeping this style of lid on it's box is to use an insert on the inside of the box. I used this technique on boxes 12, 28, 29, and 30. When I was designing this box, I decided not to use an insert. Instead, I though that I might inlay some thin circles into the front and back of the box. The inlay would be glued into the lid, but not the box, so you could pull the top off, but when the top was on, the inlaid circle would lock into the half-circle mortise in the box bottom and keep the lid in place. I considered several other shapes, too. But, honestly, all of that seemed like a colossal pain to make. So, I thought some more about it. Here's what I came up with, and it wasn't hard to do. After cutting the lid free and cleaning up the sawn edges of the lid and box, I routed a small rabbet into the lid and box. I then made some strips of maple that were just wider than the "groove" created when I put the lid on the box. I also left the maple a bit thicker than the groove was deep, so that it was just a few hairs proud of the ebony. My plan was to paint the maple, then glue it into the rabbet in the lid. That's what I did. The green strips are mitered at the corner. The strips automatically fit into the rabbet it the bottom and hold the lid on the box. There's not much else to say about this box, but I do want to explain why I painted the strips that hold the lid on the bottom. I thought about using solid wood, and quickly ran through the species I have on hand, like cherry, walnut, apple, mahogany, madrone, white oak, maple, holly (It's really not very good holly. I should not have bought it.), etc. None of them were the right color. And then there's the issue of grain. Ebony's grain is so difficult to see, that even a wood with very little grain, like madrone or apple, looks odd against it. I also thought about using curly maple, which can look great with ebony, but the strips are so small that I feared the maple would no longer look curly. Also, ebony is so lacking in variation of color, that other woods look odd juxtaposed against it when ebony is the primary wood. So, I decided to go with milk paint. It shouldn't be a surprise that I think it looks great. One last point about the strips. I left them proud of the ebony for a few different reasons. First, I wanted there to be a tactile indication of how the lid comes off. When you put your fingers on the lid, you feel the strips slightly and can grasp them to help pull off the lid. Second, it would be damn near impossible to get them truly flush with the ebony. Normally, you'd glue them in place and then plane them flush, but I couldn't do that because it would remove the paint. Of course, you could remove material from the inside face until the outside was flush, but because a bit of the inside face is exposed and painted, I couldn't do that, either. A third option would be to plane the strips flush to the ebony before I painted them, but then they would no longer be flush after I painted them and you would feel that. So, I intentionally made them proud, and they're proud enough that it's clearly intentional. Good design is always intentional. Alrighty, then, here's some random thoughts.
5 Comments
Chris
12/6/2015 03:01:17 am
Your work always reminds me - we need more Woodworkers like you who are both Woodworkers and Philosophers. Beautiful stuff.
Reply
Matt Kenney
12/8/2015 03:04:43 pm
Techincally, I guess I am a philosopher (that Ph. D. comes in handy every now and then) and a woodworker, but all I'm really doing is explaining what I was thinking. There are many thoughtful furniture makers who put in just as much--if not more--care into their designs. Nonetheless, thanks. I'll do my best to keep up the good work.
Reply
Jerry
12/6/2015 04:42:24 pm
Great box! The colors are really nice.
Reply
Matt Kenney
12/8/2015 03:05:05 pm
Thanks, Jerry.
Reply
Drew
12/10/2015 07:09:11 am
Matt, this is a fine series blending the how and why with a personal aesthetic that is inspiring for me as a self-taught woodworker in my "unplugged" workshop. Especially your thinking-outside-the-box to let designs evolve. Box 36 shows just how much the right colour can add to a piece. "Cool"--he is spot on. Thanks
Reply
Your comment will be posted after it is approved.
Leave a Reply. |
AuthorI love furniture design, and smart techniques. This blog is about both. Archives
August 2020
Categories |


 RSS Feed