
  Ellen Kaspern has been woodworking and making things for most of my life, and, in 2001, was accepted into the full-time cabinet & furniture making program at the North Bennet Street School in Boston. The school’s traditional training allowed her to totally immerse herself into woodworking & furniture making. From that time on, she has been teaching woodworking, making furniture, and working with wood. What got you started? My father had a woodworking shop in the basement of our house. Growing up, I was always down there helping him and making things out of wood. I had always been a crafty child, and my parents encouraged my love of making things. My dad had many furniture books, and I was constantly reading and looking through them. When I was in college I was reading one of my dad’s woodworking magazines and saw an article about the North Bennet Street School. Reading that article was a turning point for me. It was the first time I realized I could go to school for furniture making. After college I had moved to Boston to go to graduate school. This was in the early 90s. A couple of years after moving to Boston, I moved into an apartment directly across from the school. I thought it was fate. I went to the school’s open house that year with my dad and we were blown away. I knew I wanted to pursue woodworking seriously. I started making things with my father and taking workshops, so I could apply to the school. After I finished graduate school, I applied to NBSS and got into their furniture program. Quitting my job and going to school full-time for furniture making is hands down the best decision I have ever made. What are the 3 most important things you've learned in woodworking? There are so many things I have learned and I am still learning today. Working off of a reference edge when woodworking is one the most important lessons I have learned. It is the basis of everything I make. Secondly is the need to understand each machine's function and its limitations in the shop. Third, which probably took me too long to learn, is the importance of caring for and sharpening my hand tools regularly. Why woodworking? What does it give you that other activities, and crafts don't? I love to problem solve and I love to make things! Woodworking is a combination of both of those things. I love math and that is what I went to college and graduate school for. Woodworking and furniture making allows me to use my hands and figure out problems while making something beautiful and functional at the same time. What's something everyone should know? That there is more than one way to solve a problem when woodworking. If the voice inside your head is telling you something is unsafe then it most likely is. Figure out a different way to solve the problem. That could be by making a fixture or different setup at a machine, using a different machine altogether, or going back to basics and using your hand tools. That is the beauty of woodworking - there are many ways to accomplish the same thing. Why do you make the specific things you make? My education in traditional woodworking really plays a big part in what I make and how I make things. Having that foundation gives me the confidence to know that I can make anything. I am always looking at architecture and things in nature. The littlest thing can inspire me, especially my garden. It could be as simple as a line of an object or something I see out in nature. I am also a very nostalgic person, so I draw a lot of inspiration from things from my childhood and growing up. I have recently been working with Formica and inlaying it into my work, because my dad worked with it and made a lot of countertops using that material. I am constantly looking at objects and things and seeing how I can apply them to designs in my own work. Who has had the greatest impact on your woodworking? My woodworking community, which includes the friends I made while in school, my mentors & instructors, shop-mates, and students I have taught. I have stayed in close contact with many of the people I have met through woodworking and teaching. Without that community I would be lost. I know I can call or text them to ask questions, get help if a project is running behind, or ask for advice on how they might make something. I know I am not alone and have their support. I feel like I can do anything because of my community. Some of my very best friends are people I have met through woodworking and teaching at NBSS. I feel very fortunate and lucky to be part of an amazing group of people. Have you incorporated lessons learned in other parts of your life in your woodworking? Teaching has really influenced me as a woodworker. Students will often ask me what I am working on and what projects I am currently making. Most of my time in the shop is spent coming up with class ideas or rethinking how I am going to teach something. Teaching woodworking has really influenced me as a woodworker. I am constantly having to think of different ways to make something so I can teach to a wide range of skill levels. Then that spills over into my own work. Teaching has made me a much better maker and I learn every single time I teach a class. When I have an idea for a class I really need to think through the process of how to make it safely and efficiently. Also helping students learn, grow and gain confidence has really impacted me as a maker. What would you teach another woodworker to improve their skills, understanding or design? That nothing is perfect and we all make mistakes. Woodworking is just knowing how to fix your mistakes.
1 Comment
  I don’t recall when I first saw Valerie Berlage’s (lauraine lillie studios) work, but I do recall that I instantly liked it. What’s not to like? Her use of color, shape, texture, and pattern is creative and beautiful. Great skill combined with genuine artistic ability is always appealing! Valerie has an interesting story, and a refreshing perspective on the craft. How long have you been woodworking? All my life, in some way or another. But, it was only about ten years ago that I decided to focus solely on wood. What got you started? My grandfather is a woodworker, and he introduced me to that intoxicating smell of sawdust at an early age. He's definitely an outside the box kind of thinker, and I learned a lot from him (and still do). Then, after assisting a local woodworker by the name of Chris Kamm for a number of years, I decided to enroll in the Professional Crafts Program at Haywood Community College in Clyde, NC. (It's a great program if anyone is interested!) I needed to get some more credits to renew the teaching license I had never used, and I wanted to more fully explore the possibilities of creating with wood. You have to know the rules to break them, right? Not that you can't be self-taught and learn on your own, but I enjoy the structure of a formal educational setting. What are the 3 most important things you’ve learned in woodworking? Never underestimate the importance of clamping your piece down while chiseling (that's why I had to have four stitches in my left thumb). There is no such thing as a wood-stretcher, measure five times. Wood is the most amazing, rewarding, beautiful, frustrating, mind-boggling medium to work with on the planet. Why woodworking? What does it give you that other activities, crafts, etc. don’t? It brings me joy. Not that other things don't, but if I am going to put in the time, the blood, sweat, and tears doing something to try to make a living, this is what I want to be doing. There's something about the smells of the shop, the tactile quality of wood, the way one can manipulate this medium, that is just really appealing to me. What’s something everyone should know? Happiness cannot be overrated. Why do you make the specific things that you make? It's really as simple: I make the things that I want to make. Some things are big and take a long time, like the functional wall sculptures and large mirrors, and other things are small and provide more immediate gratification. Although, practically speaking, these small things like boxes, jewelry, and ornaments also sell well. I confess to having a deep aversion to putting any scrap in the burn pile, and I am able to use these tiny bits in my jewelry and in some of my pieced surfaces on the larger work. I enjoy the puzzle work of making something come together, in terms of both design and creation, and I don't mind reinventing the wheel a good bit. There are certain processes I use over and over, but I don't do a lot of production work. In terms of aesthetics, inspired by my childhood and the joy and memories of home, I express that through use of color, pattern, and texture mixed with simple geometric shapes. Who has had the greatest impact on your woodworking? My family. In addition to my grandfather showing me the joys of woodworking as a child, I am influenced greatly by the traditional Southern handcrafts I learned growing up. Everything I paint has a slight cross-hatch texture that is similar to the weave of fabric, achieved by alternating the direction of my brushstrokes and then sanding to reveal the pattern. And, pieced surfaces that I liken to quilting with wood feature prominently in some of my work. I learned my love of color from the strong women in my life: my mom and my two grandmothers. My paternal grandmother especially, who would advise as we were coloring to use all the crayons in the box. Have you incorporated lessons learned in other parts of your life in your woodworking? I think the time I spent pursuing my BFA at the UNC Asheville was especially beneficial. Color theory, painting techniques, that push to look at everything from ten different angles, exposure to diverse art history, mediums, and methods of making. It's probably a good part of why I consider what I do to be "woodworking outside the lines." What’s one thing you’d teach another woodworking to help them improve their skills, understanding or design? I don't believe talent can be a substitute for hard work. We are all born with certain talents, but we have to practice them to perfect them. If you want better dovetail cutting skills, you're going to cut thousands of dovetails to achieve that mastery. You want a better understanding of woodworking? Get to reading, watch Matt Kenney's YouTube channel, take a class, talk with an expert at whatever skill you want to conquer. If you want to improve your designs, you're probably going to rework, reimagine, redraw them dozens of times. And inspiration for designs can be found everywhere, not just your favorite woodworker. Nature, geometry, architecture, science: It's all fodder for good design. The point is you have to put in the time to reap the rewards.
   Last October, I taught a small box-making class in my shop. One of the students was Alexis Rosa Caldero, and she rocked it. But what most impressed me about her is this: She brought her mom with her to take the class also. And her mom did awesome! It was so much fun to have them both in the class. Alexis studied design in school, and has been woodworking for about 11 years. After school, she scored an unbelievable job as a designer working alongside Mira Nakashima at George Nakashima Woodworkers. That’s legit, and much better shop credentials than being a goofball at a woodworking magazine for 10 years. Follow her IG feed: @lexcmakes. Read her answers to my questions below. What got you stared woodworking? A desire to be in conversation with more than just an object and the one who uses it, but with a material that has a life of its own. What are the 3 most important things you’ve learned in woodworking? Patience, confidence, & humility Why woodworking? What does it give you that other activities, crafts, etc. don’t? There is an unpredictability to working with wood that you can’t find in most other materials. I find it a grounding process and enjoy collaborating with nature on each design. What’s something everyone should know? Aside from safety considerations, there is no single “right” way to do a thing. Find an approach that you enjoy (and that works) and run with it. Why do you make the specific things that you make? As a furniture designer, my craft up to this point has centered on the needs of the wood at hand while folding in the wants of the client. Now, I’m in the process of flipping my approach. In recognizing that generalized standards marginalize people, I’m interested in meeting the needs of the body beyond ergonomics while being guided by what the material has to offer. What is central becomes the person and what their body carries, allowing the wood to act as an agent for corporeal healing. Who has had the greatest impact on your woodworking? My first instructor in furniture design, Tom Merriman, was the spark who ignited my connection with the art of woodworking in undergrad and opened the doors that have shaped my trajectory. Have you incorporated lessons learned in other parts of your life in your woodworking? Absolutely! Patience is a big one, I’m not sure if that came from woodworking, but woodworking sure has honed it. What’s one thing you’d teach another woodworking to help them improve their skills, understanding or design? Sharpen those blades! There’s nothing more helpful in the shop than a mirror sharp blade. When it comes to design, iteration is a super power. You’ll find out what you like, what you don’t like, and sometimes surprise yourself.
  Mark Tan is a great furniture maker. I met him at Anderson Ranch Arts Center in Snowmass, CO last year (2019). He had invited me to teach a 5 day box-making class. He ran the shop there and was in charge of woodworking programing for Anderson Ranch. My experience there was amazing, and that's because Mark did a fantastic job. The shop was in perfect running order, and he and his assistants where there to help whenever I needed it. He has a mature and beautiful aesthetic. I asked a series of questions, and I'll let his answers speak for themselves. Mark has left Anderson Ranch, and begins the MFA program in furniture design at Virginia Commonwealth later this year, assuming that we are not genuinely at the end times. If you are on Instagram, give Mark a follow. He's @nintando. Oh, I bet Mark didn't know this, but he and I have something in common. As I teenager, I also spent time making street ramps and halfpipes for skating. His love for woodworking started when he was 16, because of skating. I think I was a bit younger, but I am 100% certain that Mark was and still is a much better skater than I ever was. What got you started woodworking? Skateboarding. Skateboarding got me started in woodworking. When I was 16, I had found an obsession with it. Everything about the lifestyle, from DIY obstacles down to the physical board itself, all of its details were brought to my attention: the curves, the layers, the material, etc. I found this exploration of creativity to be limitless. My friends and I would look through the magazines and watch all the VHS videos and dreamt about the possibility of making our own ramps, boxes, and rails. We got around to achieving our goal of making these objects. The woodshop classes in high school is where I spent most of my time which eventually lead to me pursing Furniture Design in the Crafts & Design Program at Sheridan College. What are the 3 most important things you’ve learned in woodworking?
Why woodworking? What does it give you that other activities and crafts don’t? Woodworking gives you an opportunity of discovery throughout the entire design and building process. When you start sketching ideas, you discover that maybe you want to build something else and generate new ideas. When you start making scale models, you discover that maybe your proportions are off. When you start making a full scale mock up, you might discover that maybe the seat height is too high or too low. When you start milling rough lumber, you discover the patterns in wood grain. This sense of discovery during the entire process is what other activities don’t give you. The satisfaction of completing a piece with a malleable material is fascinating in the sense that all of those questions are almost never asked or noticed from the general public. What’s something everyone should know? When an opportunity arrives, just say yes. Leave all of the doubts behind you. If you ever get a chance to visit a craft school for a workshop on a scholarship, residency, etc., just say yes. These are life changing experiences that will advance your artwork and may lead to new opportunities. Why do you make the specific things that you make? The things I make is a creative form of self expression. I intend to design products that are understandable and long lasting while being thorough down to the last detail. The work I produce has to satisfy not only function, but also aesthetics. My ambition is to create work that brings joy to those who appreciate it, and I strive to reach simplicity, form and function. The objects I make have become very clean-lined and minimal, and consist of monochromatic tones. Who has had the greatest impact on your woodworking? This is a hard question to answer. During my time at Anderson Ranch, I was able to work alongside some of the best in the business. When I was programming workshops, I had one goal in mind: cater to everyone. Woodworking has multiple ways to approach your ideas, techniques, and execution, and I was fortunate enough to have the opportunity to see multiple approaches to fine woodworking, and broad experience of the craft generally. Have you incorporated lessons learned in other parts of your life in your woodworking? Definitely! Don't be shy! I’ve seen some woodworkers get nervous or embarrassed to work in front of others. Just go out there and do it. Ask questions and learn from your mistakes, because the possibilities in woodworking are unlimited. What’s one thing you’d teach another woodworker to help them improve their skills, understanding or design? The craziest thing about making work is that you can say what if? What if I do this? I think I could do this! And you could go do it. You can take something that was pure thought and turn it into a reality. Making art is a matter of putting ideas into action and turning them into reality. I’ve sat through many demos of the same idea but taught with a different execution. Interact with all of them, and you will discover what works best for you and start to develop your own voice.
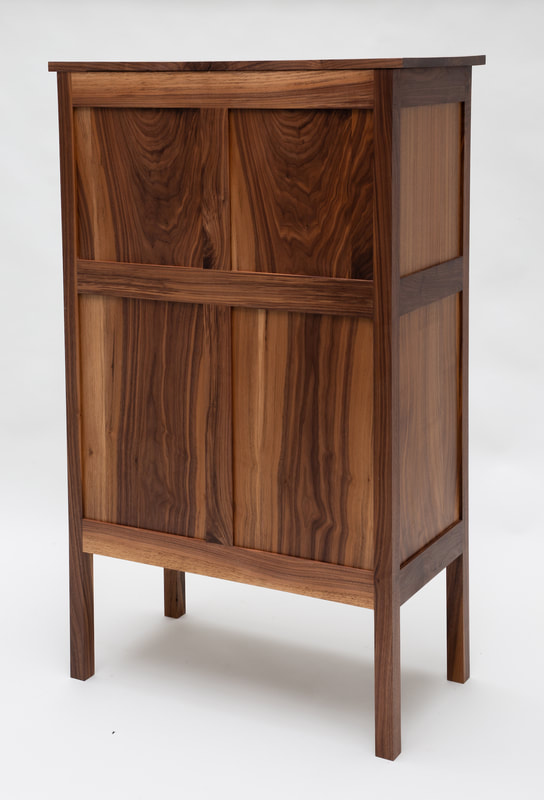
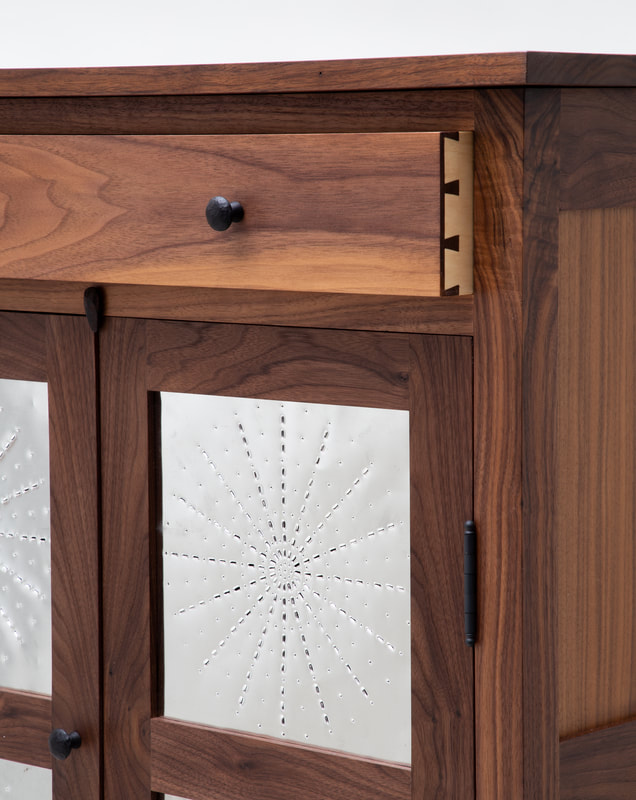
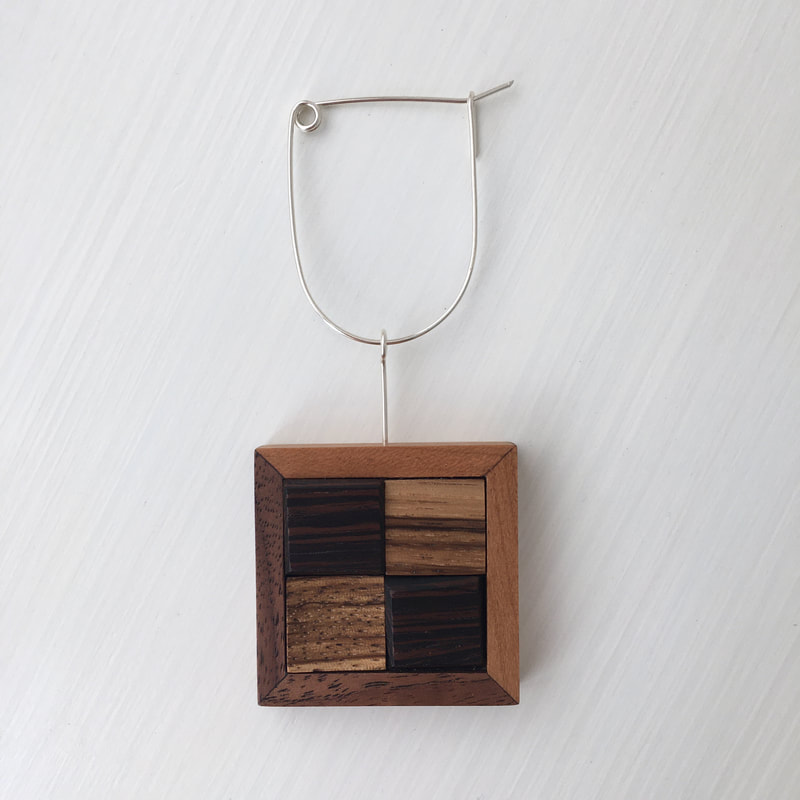
 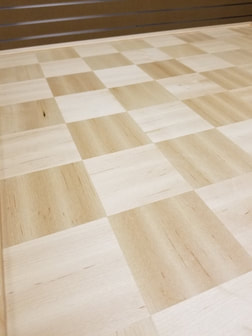 By orienting the grain 90º in adjacent squares, Amanda created a chessboard using a single species. By orienting the grain 90º in adjacent squares, Amanda created a chessboard using a single species. I first met Amanda Russell (@sawdustwoman) when teaching at The Austin School of Furniture and Design in 2019. She was my shop assistant, and did a great job. She was my assistant again this year and did another outstanding job prepping materials, setting up machines, and putting up with me. She also introduced me to Electric Jellyfish IPA from Pinthouse Pizza. Thanks for that! When she’s not working at the school, she’s helping Philip Morley keep his act together, and does amazing work for him. Her skill level is truly impressive given that she started woodworking about 5 years ago!
What got you started in woodworking? My grandfather and Dad are both self-taught woodworkers. Growing up, I was able to observe both of them work in their home shops, which instilled a love for creativity and working with my hands. I never thought to try woodworking for myself until I was in my early twenties, my first project was woodturning a muddler (I was bartending at the time), and was immediately hooked. After attempting to teach myself, I realized a classroom environment the best and most efficient way for me to learn, so I moved to Austin to take woodworking courses at community college. It turned out to be one of the best decisions I’ve made. What are the 3 most important things you’ve learned in woodworking? Don’t let one mistake dictate the rest of your day, don’t let the potential of failing hold you back, and grain direction can make or break an otherwise really beautiful piece. Why woodworking? What does it give you that other activities and crafts don’t? As someone who loves many creative processes, woodworking was a craft that fulfilled the structure and critical thinking I also enjoy. What’s something that everyone should know? Embracing who you are is a huge part of whatever you do. As a woman in a male-dominated field, I spent a lot of time and the early part of my career making myself small and wanting people to only see me for my abilities. Ultimately, I realized this not only held me back, but potentially hindered much needed progress within this craft. It is a continuous work in progress, but has made me much more confident in my work, and also perceptibly changed interactions in my work and day-to-day life. I'm glad that you decided not to make yourself small anymore. How'd you do that? Making myself seen and heard came in the form of taking risks with design and the process, putting my "mark" on things when I knew things could be improved or changed. At the time this shift happened, I was l asked "Do you see yourself as a threat, being a woman in a man's shop?" It was then I realized some percieved me simply working hard and getting ahead as an intrusion, when others were rewarded for that behaviour. I can't tell you how many times I've been told "It is so cool you woodwork, because you're a woman" I accepted and knew my role was to break through that bias, walk in a shop and work despite being questioned. Sharing my journey openly, so current women in the field are encouraged and women entering this craft aren't discouraged by that bias. Leading by example, but also addressing the issue openly. My business name, Sawdust Woman, actually came from consciously taking on this role. I had another woman tell me it made her feel like a superhero, and that's exactly what I had hoped for. Why do you make the specific things that you make? Learning new skills dictates a lot of my work. My most recent project was a chessboard created with parquetry from shop made veneer, two new techniques I had never attempted by myself before. Who has had the greatest impact on your woodworking? Philip Morley. He’s an incredible craftsman, designer, and instructor, who I’m very fortunate to call a mentor. Getting to witness even some of his process on design and execution is one of the most crucial things I’ve had to help my journey (Sometimes, I go home with headaches trying to wrap my brain around how he came up with a jig. Haha) From woodworking to teaching, He has made a huge impact in what I do. Have you incorporated lessons learned in other parts of your life into your woodworking? Absolutely. Woodworking requires understanding that you can do everything just right: selection, acclimating, milling, and sometimes it just won’t work. Sometimes you put hours into something, almost get to the finish line, just to realize you need to start all over or change your approach completely. Patience, adaptability, and determination. What’s the one thing you’d teach another woodworker to help them improve their skills, understanding or design? I was taught recently to “Draw and design first, then worry about joinery later". I would get so hung up on the process that I was limiting design to very restricted parameters, and just frustrating myself.   As a child in Jamaica, Dushane Noble saw his grandfather make furniture as a hobbyist, and thought that he’d do the same after he retired. But a few conversations with a friend about the futility of living in the future spurred him to pick up some woodworking books and start making furniture. That was 7 years ago, and he’s happy that he didn’t wait until retirement to get into the shop.
Although Dushane makes furniture in his spare time, it’s works that dovetails nicely with his day job as a fashion designer for the clothing company Theory. He specializes in seasonal knitwear and designs anywhere between 60 and 100 pieces per season. Woodworking, he says, is a creative outlet that allows him to focus on things that will last and evolve over time. Furniture is timeless. And he enjoys focusing his energy and intention into the design and engineering of one piece of furniture at a time. I asked Dushane several questions, and I’ll let his answers speak for themselves. What are the 3 most important lessons you’ve learned in woodworking? Patience is your best friend, mistakes are an opportunity to grow, and taking the time to sharpen your tools when they need it saves you lots of time later. Who has had the greatest impact on your woodworking? Yann Giguère of Mokuchi Studio. Watching him work, the few chances I’ve had to do so, gave me a whole new understanding of “intension.” I’m also forever grateful that he introduced me to Japanese tools. Why do you make the specific things that you make? Through the things I make and design, I’m searching for a certain level of beauty and balance that challenges the senses. Music has a way of moving us, and I’m always trying to see if its possible to move people through form. Have you incorporated lessons learned in other parts of your life in your woodworking? While studying in design school a lot of attention was placed on research and the study or different styles, forms and objects. The design and development through intense research, sketching, mock ups and layouts have become a big part of my wood working process so far. What’s one thing you’d teach another woodworker to help them improve their skills, understanding or design? It's ok not to get it right the first time. Practice makes perfect. What’s something everyone should know? That there is a human behind every piece of clothing we buy. If it’s inexpensive for you, it’s usually at the cost of someone else.  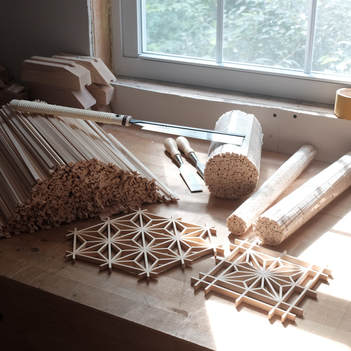 I've made a lot kumiko panels in the last year, and folks seem to like them quite a bit. I'm thankful for that. I'm also glad that other woodworkers are interested in making kumiko, too. I thought it would be helpful to answer the questions that I am asked most often, and have them available here on my website. So, here goes.
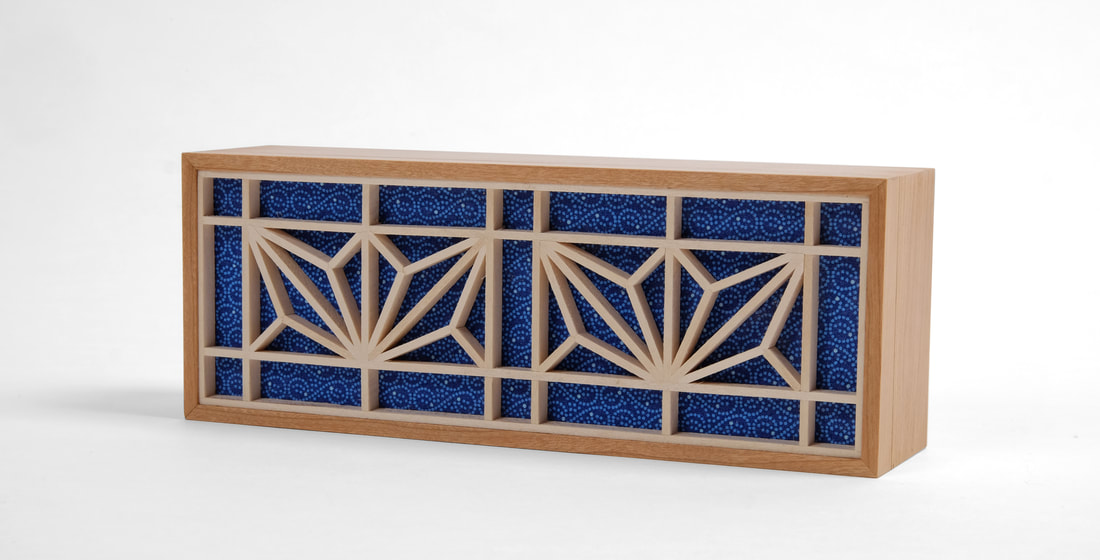
  I've made a fair number of kumiko panels now. I am not an expert by any means, but I have a solid understanding of the fundamentals of the art. Here's something that I've figured out. The technical challenge kumiko presents, at least the patterns you're most likely to start with, is not that great. The frame parts can be made quickly at the tablesaw with a finger joint jig. The pieces for the infill pattern are not tough to make either. A set of guides ensures that you pare the correct angles on the pieces' ends. But this doesn't mean that you can be thoughtless when making kumiko. In fact, you must be insanely focused, because the simplicity of what you are doing can lull you into sloppy work. The challenge of kumiko isn't a matter of skill or technique, but of precision, and that just doesn't happen when you're giving your work all the care of a goth teenager doling out frozen yogurt for a summer job.
Certainly, there are things you can do in terms of technique to improve precision, but I've found that even the best technique falls short if you are not patient, and do not give your work attention. In this way, making kumiko is no different than making furniture (and so many other meaningful activities we undertake in life). What does it mean to be patient? I think it's allowing the work that you are doing to dictate the pace at which you do it. There's a cadence, a rhythm to all the work we do in the shop. To be patient with your work you must consider each individual task and distill it, so that you see it's essential components, so that you understand where you can work quickly, and where you must slow down. You can cut tails very quickly, for example. Get that backsaw humming and knock them out. However, when it comes time to transfer the tails to the pin board (only savages cut pins first), you must slow down, get the boards aligned properly, hold the pencil or knife just right, and make a careful stroke. So, patience is always moving at the correct speed for the work you're doing. Attention is just as important, and it's not just a matter of being focused on the work at hand. You also must have a clear mind. If you're thinking about how your mother-in-law always smells like cabbage, your thoughts and the actions that flow from them will be muddled. When you are paring angles on the infill pieces of the asa-no-ha pattern, there should be nothing in your mind, but your hand and how it holds the chisel, how it pushes the chisel through the small part beneath your fingers, the resistance the wood gives or doesn't give, the sound made as its slices through the wood, etc. That level of attention enables you notice the smallest hiccup in the process, to notice minute blips that affect the precision of your work. So, the big question is how do you go about acquiring patience and attention? Attention is probably easier to develop. When you go into the shop, don't start working right away. Put away the tools you left out last time. Sharpen a plane blade. Clean up your bench. Sweep the floor. Give your mind time to leave the world outside your shop. Patience comes through work. To truly understand a task like cutting dovetails or making tiny little boxes, you must cut dovetails and make tiny little boxes. And then do it some more, and, then, do it some more again. There is no shortcut here.There are no tricks. Perhaps that sounds daunting, but look at this way. You get to spend more time in the shop making furniture, boxes, spoons, bowls, or whatever. That's a good thing. The world's a better place when folks are using their heads and hands to make useful things. Random thoughts:
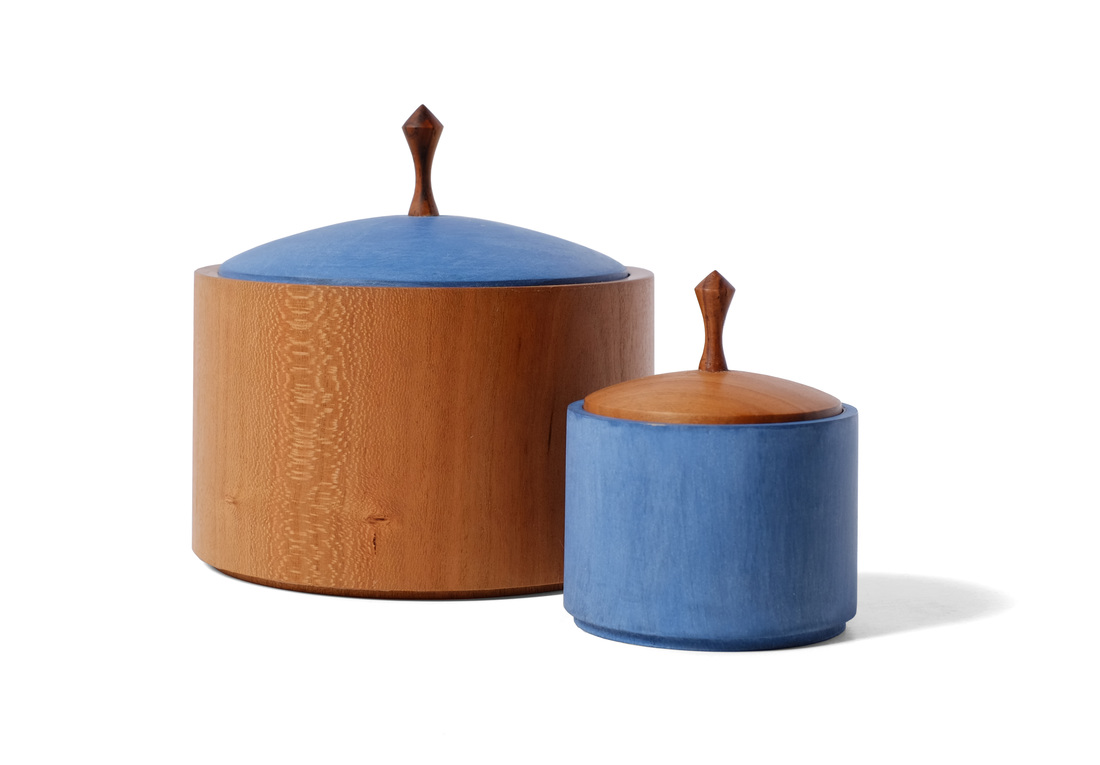
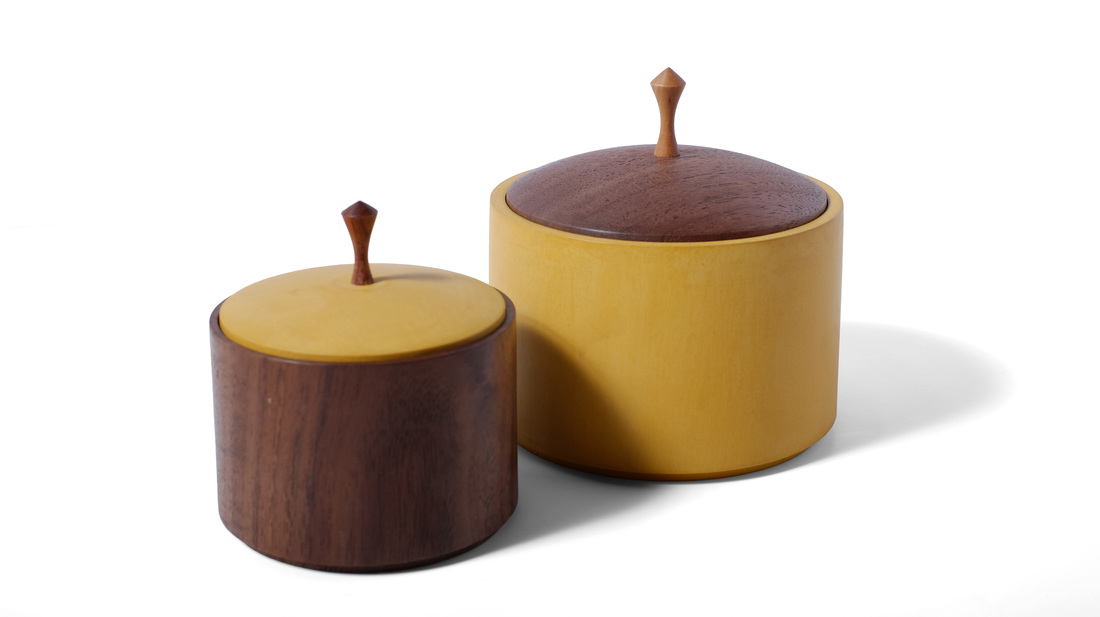
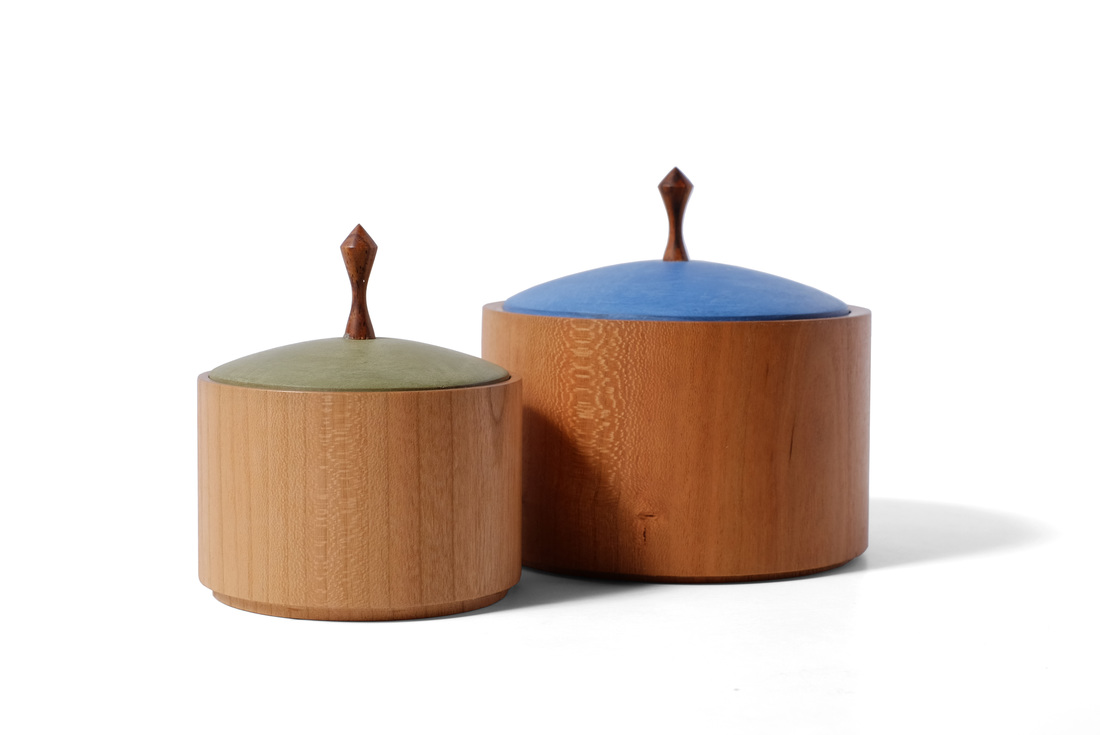
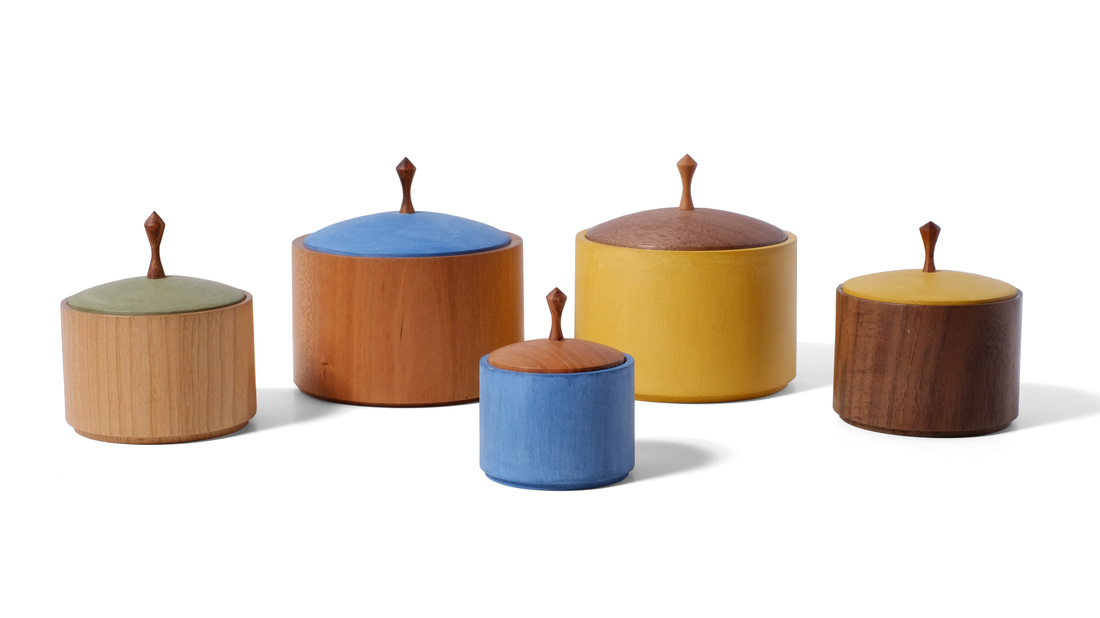  I made one of these boxes during my 52 boxes project. It was box 11, which was based on some boxes that I had made before I started my year of box builds. And those original boxes where inspired by the round barn at Hancock Shaker Village. Like the barn, the boxes have three levels, the pull being the analogue of the cupola. But they're not a strict interpretation of the barn. The lid sits in a rabbet rather than overhanging the sides to mimic the eaves. And the pull shape is quite a bit different from the straight sides of the cupola. The box is a stylized and modern interpretation of the barn. I don't know if the barn is painted with milk paint (I once asked, but can't remember the answer), but the fact that it is painted is why I used milk paint on my boxes. The Shaker inspiration aside, it's a simple design, but there is something about it that's also rather elegant. I think the elegance comes from the the slightly tapered diameter. The boxes are just a hair bigger at the bottom than at the top. It gives them a touch of lightness. The lines are very clean, too, which helps. The pull is a shape that I've been making for years. It varies a bit each time I make it, as you can see in the photos, but at its heart is a curve that I make by testing to see when the pull fits comfortably between my thumb and pointer finger. I like how using the human body as a guide for a pull's comfort, a chairs height, etc. results in beautiful work. There are three different sizes of the box, the largest being about 3 in. diameter. The smallest box is perfect for holding a ring. I use one the size of the largest to hold spare change on my dresser. As for the woods and colors, there are two woods (cherry and walnut) and three colors (Federal blue, Marigold yellow, and a green that I make by mixing the other two colors). There is diversity in the boxes, but also they are nicely tied together by the limited wood and paint choices. I like the walnut box with Marigold lid box the best. OK, that's it.
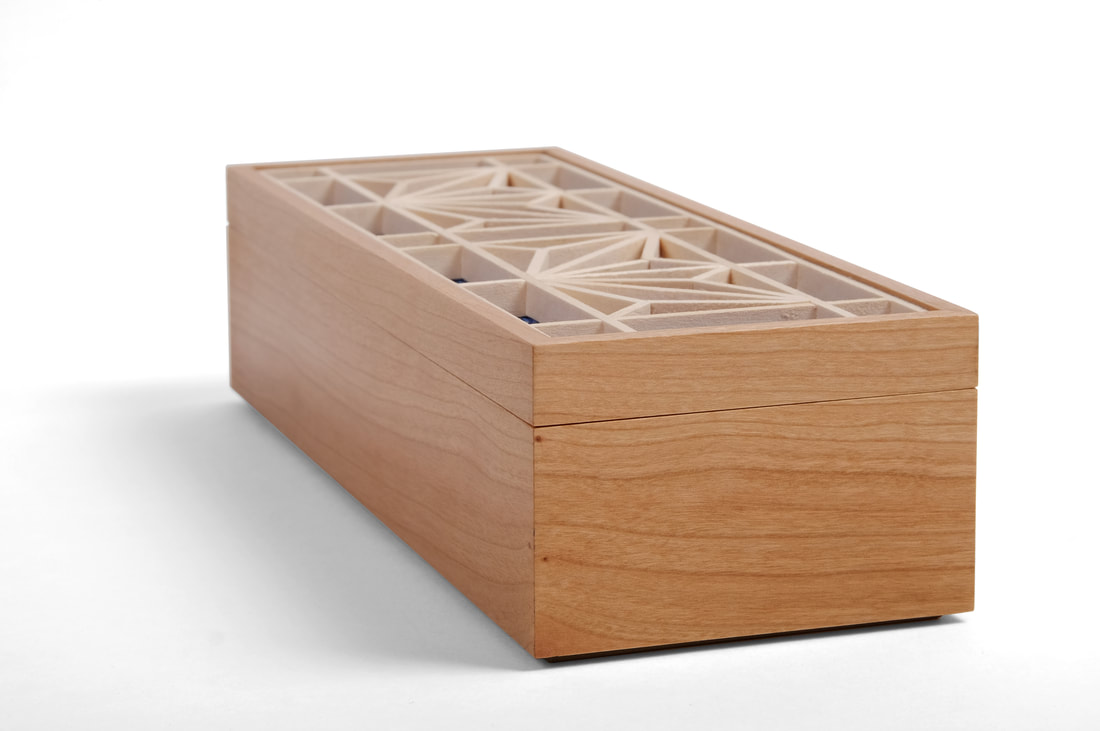
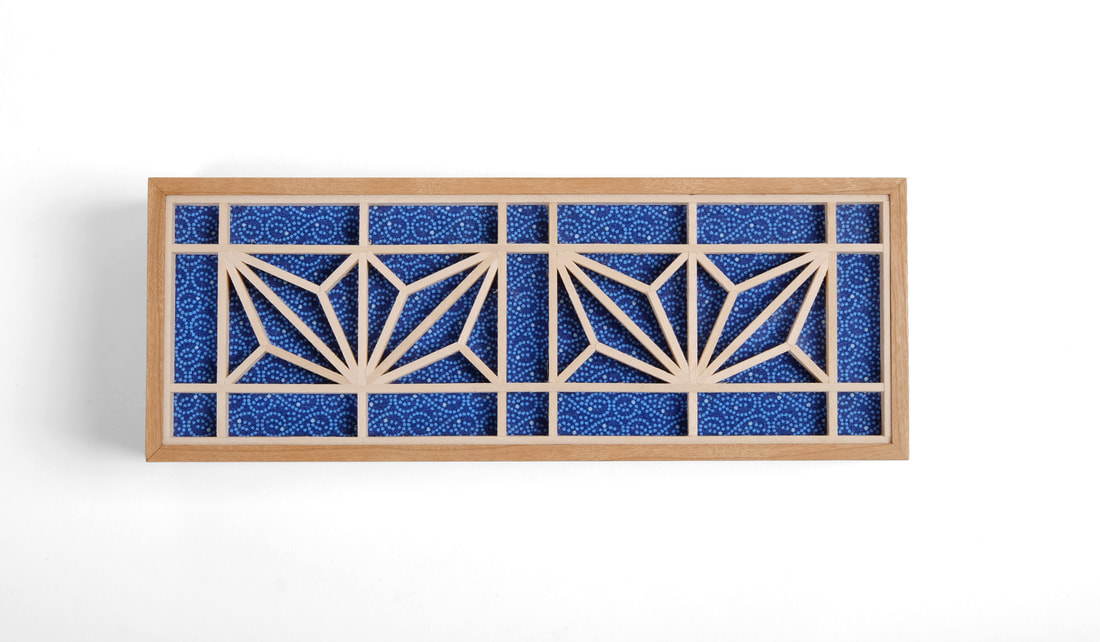 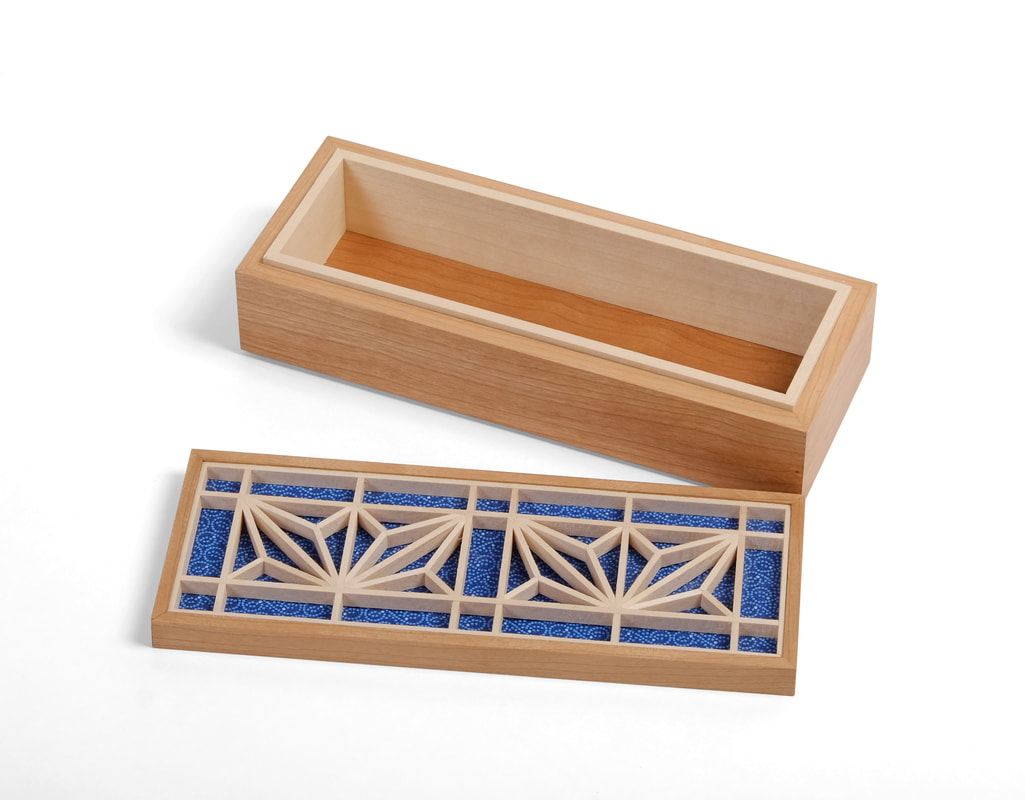 I started to make this box at the beginning of September, when I was teaching a class on kumiko at Peters Valley School of Craft. It was just something to work on at night, after the class was over. It's 2 in. tall, 3 in. wide, and 8 in. long. The sides are 1/4 in. thick. The liner inside is about 1/8 in. thick. That's a bit irrelevant, though, right? This box is all about the kumiko panel in the lid. I don't think this is a real kumiko pattern, but it is based on one. Each of the rectangle patterns is one half of a square asa-no-ha, or hemp leaf, pattern. I like it because rectangles work better than squares with the shape of my boxes. The kumiko pieces are just 1/16 in. thick. That's very thin and a bit tricky to work, but it's proportionally right for the size of the box. It took me a while to settle on a fabric to put beneath the kumiko, but I think I got it right in the end. The challenge is to find a pattern that's small enough to repeat within the panel, but also not so busy that it's distracts from the kumiko pattern. I tried many floral prints, but none were quite right. This abstract patter does the trick, and the blue is a great background color for the creamy pale color of the basswood. Why two little leaf patterns instead of one? Partly because the math just doesn't work for one. The height of the individual leaf patterns is one half the length. To get a single long pattern into the lid, the box would need to be wider. However, the box's proportions would then be all wack. And nobody wants wack proportions--me least of all. More importantly, there is something nice about the pattern repeating. I'm not sure what it is that's nice about it, but it looks right to my eye. A single pattern would not be as pleasing. 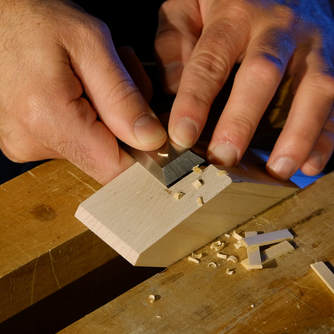 Here's something that I've learned about kumiko: I like making it. I love the precision of it, but what I really like is sitting at my bench, cutting angles onto the ends of the tiny pattern pieces, and getting them all to fit together, with naught but friction holding them in place. It takes focus, the type of focus that liberates you from all your other concerns. There is a rhythm to the process that is almost hypnotic, and you certainly loose yourself in it. The chisel becomes an extension of your hand. What you think, it does. And what it does, you feel. There are times that I feel every fiber as it is cut by the chisel. There is a powerful control in this feeling. There is also a deeper connection to the wood in it. When it is all going just right, a clarity comes to my mind, one in which I understand what I am doing at an intuitive level, and I can make the small adjustments that are sometimes needed without thinking about them, and without trial and error. I make the change and it's spot on. This, I know, is bordering on the rapturous, but this is not what I intend. If I were to describe in philosophical terms, I'd say that its a state in which one's epistemtic, emotional, and tactile connection to the world align, and the boarders between them begin to disappear. There is almost a change in one's ontological status. (Hmmm. Maybe I've had too much rum tonight.)
Here's a few random thoughts:
|
AuthorI love furniture design, and smart techniques. This blog is about both. Archives
August 2020
Categories |


 RSS Feed