
 Left: walnut, marigold yellow milk paint, wenge. Right: cherry, federal blue milk paint, cocobolo. 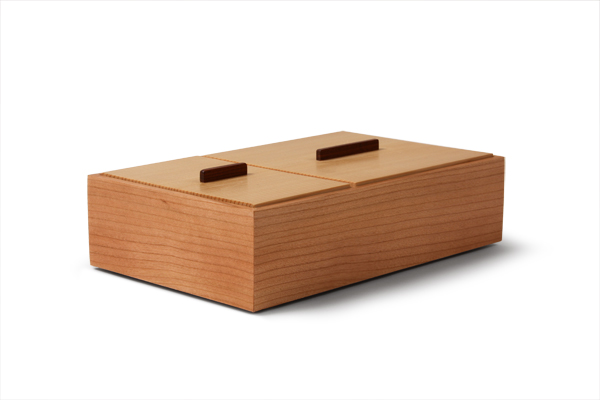 Box with two compartments. Cherry, spruce, cocobolo. 2 in. x 5 in. x 8 in. Box with two compartments. Cherry, spruce, cocobolo. 2 in. x 5 in. x 8 in. These are boxes 1 and 2 in my 52 weeks, 52 boxes challenge. I wanted to make a small, delicate box. But then I thought the box would like nice as a pair, so I made one in walnut and one in cherry. I'm happy with how they turned out. Together, they make a bold graphic statement, and they should remain a pair, I think. I made them both in the first week of the challenge. I like the proportions: just over 1 1/2 in. tall, 1 3/4 in. wide, and 5 in. long. That's really small, but I think that I can go smaller. I'm sure I'll give it a try later in the challenge. I should note that because the ends are so short, I cut the sides apart with a dozuki, and squared up the ends at my shooting board. I then cut the miters at the shooting board, too. This technique resulted in a very good four corner grain match, because cutting out the sides and mitering the ends removed very, very little material. I think I'll continue to make small boxes this way going forward. (It also helps to start out by resawing with a thin-kerf bandsaw blade.) The overall design is similar to other boxes that I've made, like the box with two compartments in the photo above. The big difference is that this new box has a single, painted lid instead of two wooden (spruce) lids finished with shellac. This is the sixth box I've made using the same key design elements as a jumping off point. I also tried out a new technique on this box. On previous boxes, I used a solid wood bottom that I rabbeted. The resulting tongue on the bottom's edge fits into a groove in the box sides. The sides of this little walnut box are far too thin (less than 3/16 in.) to hold a groove. Instead, I rabbeted the bottom edge of the sides, and glued the bottom into the rabbet. Don't worry, it's not a solid wood bottom. I veneered a thin (3/16 in. thick) piece of walnut to each face of the plywood, trimmed them flush to the edges, and then glued walnut edging to all four sides. The walnut veneers were glued down perpendicular to the grain on the plywood's surface veneers. There won't be any seasonal movement, so there shouldn't be any problems. I got the idea for the bottom from how I make backs for wall cabinets. There is one other construction technique worth mentioning. I typically glue lid lifts on with cynoacrylate glue, but that wouldn't work here. I'm sure the glue would stick to the milk paint, but it could come undone eventually. So, I drilled two pilot holes in the top, drove in some little brad nails and snipped off their heads, leaving about 1/4 in. of nail sticking out. I drilled holes in the lift, dropped some glue into the holes, and put the lift on the nails. It worked brilliantly.
16 Comments
|
AuthorI love furniture design, and smart techniques. This blog is about both. Archives
August 2020
Categories |
 RSS Feed